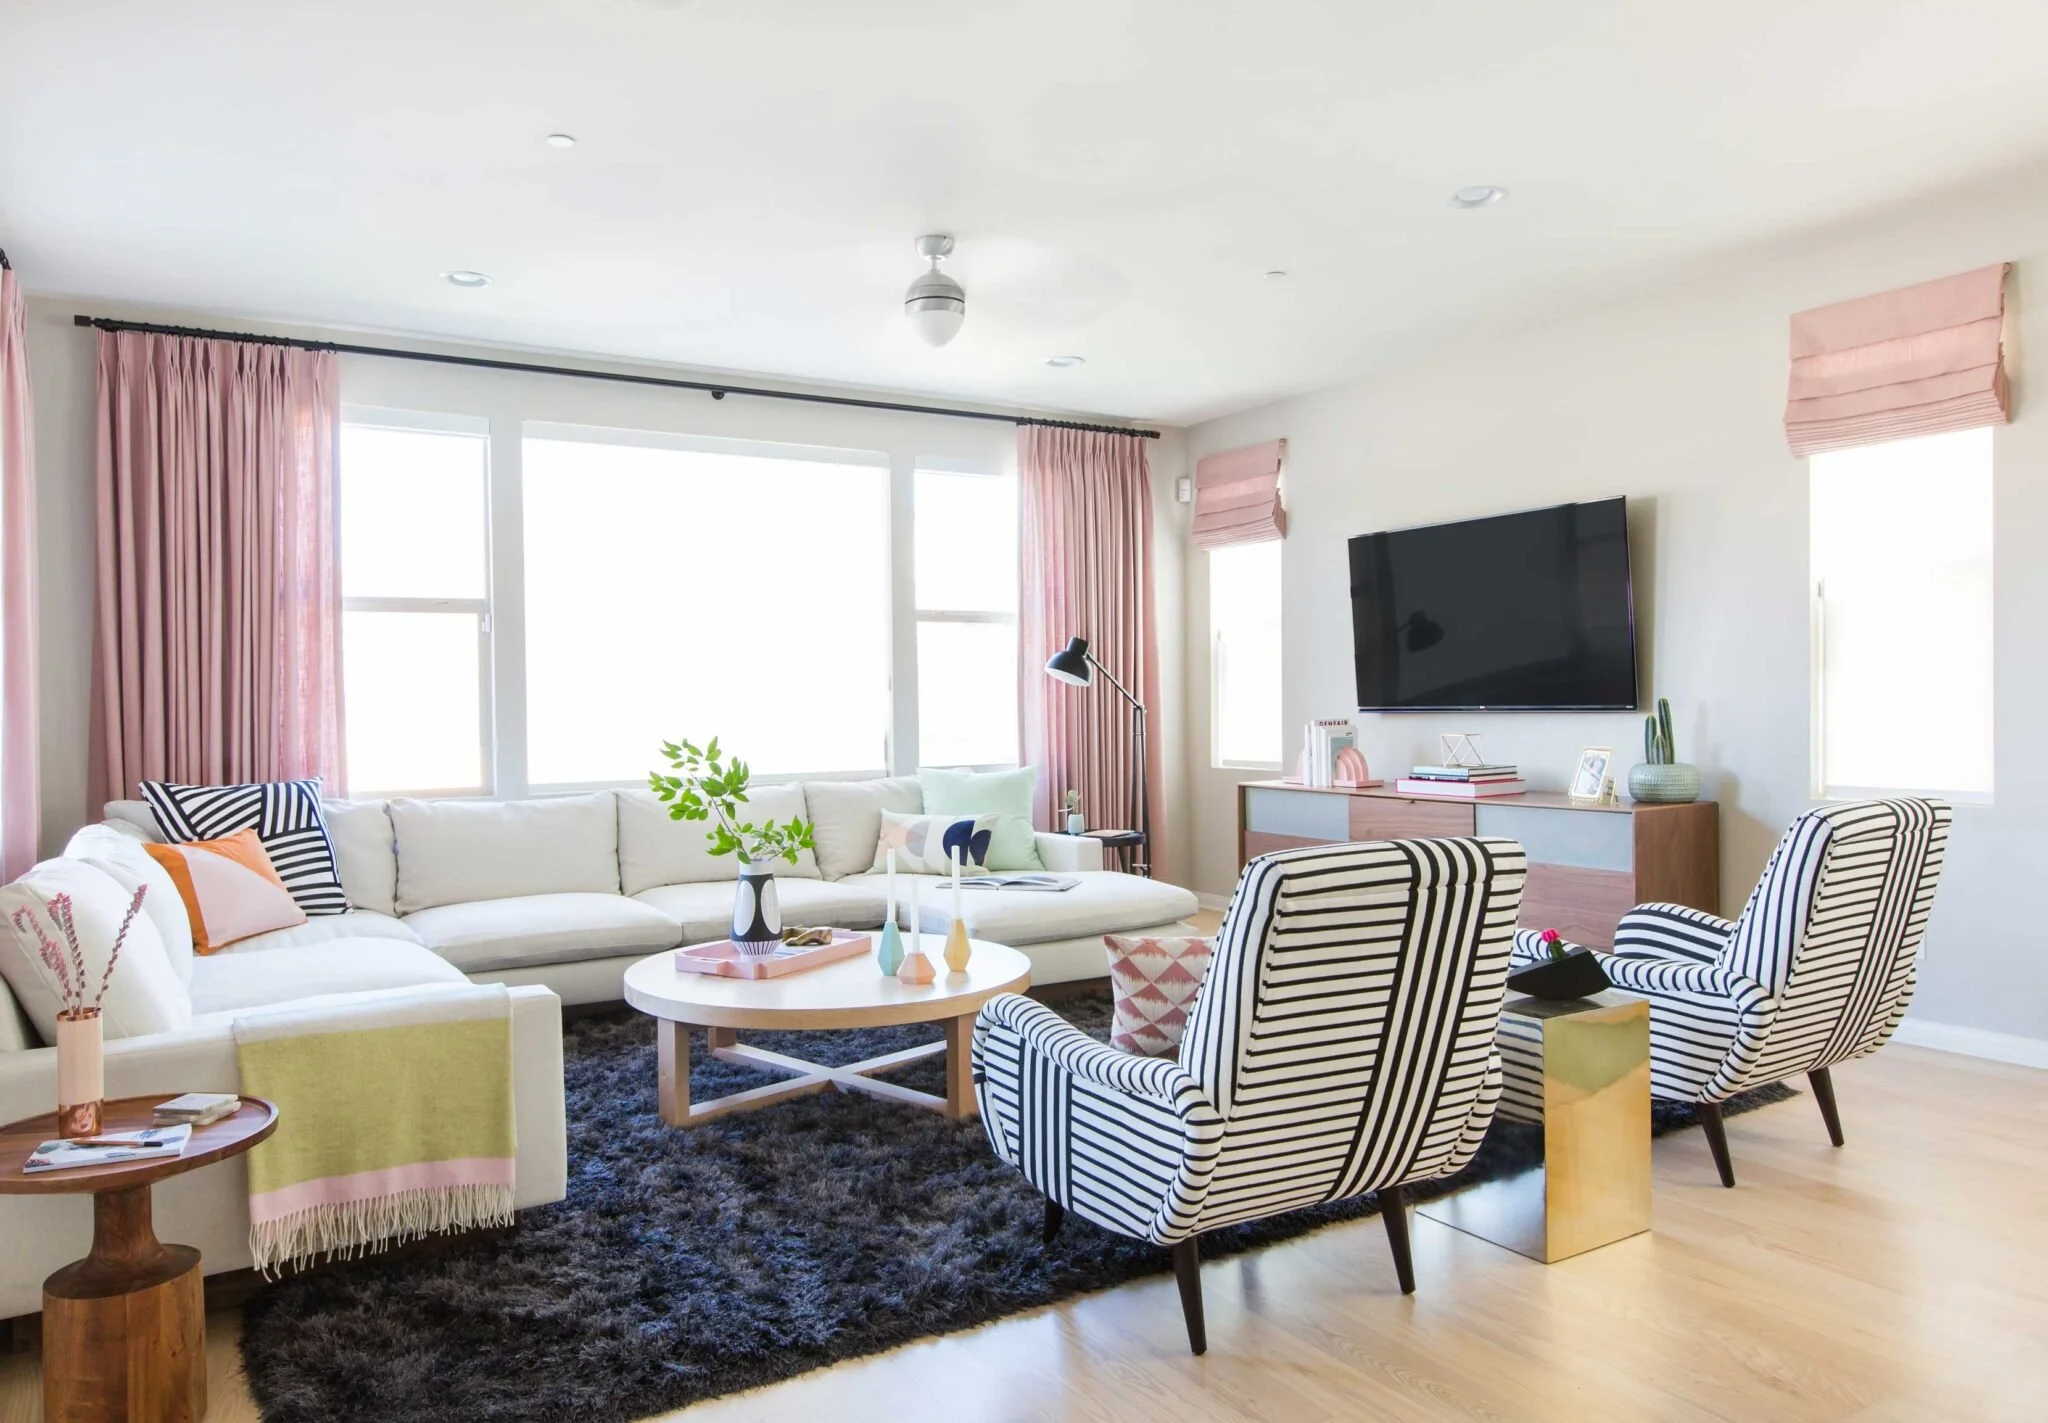
Garage Makeover Inspiration: How to Create a Chic Dining Area

Transforming a Garage into a Haven:
A Symphony of Style and Function in This Project Reveal
Sponsored by Photowall

Introduction
From the dusty corners of a detached garage in Vancouver, Washington, emerges an eDesign project that breathes life into this neglected space, turning it into a stylish and functional haven.
Drawing inspiration from the design fusion known as Japandi, where Japanese minimalism meets Scandinavian practicality, with a dash of industrial and mid-century modern vibes, we're about to witness a design transformation. But that's not all – Retro Glam serves as another pivotal inspirational style for this endeavor.
The ultimate goal? To pay homage to the historical charm of a 100-year-old bungalow while infusing it with a contemporary spirit and embracing the comforting warmth of the Grandpa Chic aesthetic.
We're crafting a space that's not just up-to-date but also inviting and stylish—an ultimate gathering spot for friends and family.
This post may contain affiliate links.
Allow me to introduce you to the Japandi, industrial, mid-century modern, retro glam, and grandpa chic influences for this space.
Continued after this image and table of contents…

Project Name: Vancouver Garage Finish
Design: Julie Ann Rachelle Interiors LLC
This charming 100-year-old cottage’s garage in Vancouver, Washington, is getting a Grandpa Chic-inspired garage renovation. The goal is to create a stylish and functional space that respects the home's historic significance. The neutral color palette and natural materials will create a calming and inviting atmosphere, while the Japandi, industrial and mid-century modern elements will add a touch of sophistication.
Table of Contents
Design Philosophy and Influences for Urban Dining Space Garage Metamorphosis
Sponsored by Photowall: Bringing the Lilacs Grail Mural to Life
Japandi Influence: Merging Minimalism and Rustic in This Garage Finish
Industrial and Mid-Century Modern Touches: Sleek Garage Revamping
Grandpa Chic Inspiration: Adding a Vintage Twist
Retro Glam: Client’s Favorite Locale Inspires the Garage-To-Entertainment-Space Interior
Gallery of concept and mood inspirational images
Color Palette and Materials for My Client's Detached Garage Overhaul to Dining and Entertaining Space
Floor Plan Presentation
Functional Design in Garage Makeover to Living Space
Counter Serving Area in This Transformed Garage
Cozy Dining Area for a Warm Ambiance
Storage Area Inspiration: Clever Idea for Garage Makeover
3D photo-realistic rendering of the hidden storage and grill
“AFTER” image of the same angle as above
“IN PROGRESS” photos of the same angle as above
“BEFORE” & “AFTER” photo of the grill storage area
Furnishings and Decor for Converting a Detached Garage
Furniture Selection for Garages Turned into Entertaining Location
Decor and Accents: Aesthetic Garage Upgrade Ideas
The Art of Details
Implementing the Design for Garage Room Rehab Idea
Project Planning and Execution for Garage Makeover
Sourcing Materials and Furnishings for the Garage Entertaining Space Redesign
My Client's Thanksgiving Vision: From Garage to Chic Dining
Unveiling the Potential of Your Garage Shelter for an Entertaining Area
Get Expert Help For Your Best Garage Finishing
COMPLIMENTARY DESIGN DISOVERY CALL: Tailoring to Your Vision

Project Overview Presentation
Design Presentation Excitement!
Get ready to be wowed as we delve into the captivating project overview during our design presentation to our esteemed client! Right below this stunning image awaits a detailed explanation that will leave you inspired and eager to see more! Let's dive in!

Project Name: Vancouver Garage Finish
Design: Julie Ann Rachelle Interiors LLC
Project Overview
Styles: #GrandpaChic, #IndustrialLoft
Era: #Midcentury
Theme: #RetroGlam
Left upper: The project focuses on masculinity, simplicity, warmth, functionality, and spaciousness. The design features clean lines, a neutral color palette, and natural materials such as wood and greenery to create a peaceful and inviting atmosphere. The use of natural light and simple but stylish lighting fixtures helps to highlight the beauty of the space while creating a warm and cozy ambiance. The furnishings are chosen for their functional design, with a focus on comfort and practicality.
The overall effect of the design is a harmonious and relaxing environment that is both functional and aesthetically pleasing.
Left lower: NOTES
“Design is not for philosophy, it's for life.” ― Issey Miyake
This quote underscores the idea that interior design should enhance and enrich one's life, aligning with the practical and timeless nature of Grandpa Chic design.
Right upper: The use of natural materials such as wood and greenery adds warmth and texture to the space, while accents of black or darker hues provide contrast and depth. The resulting effect is a timeless and sophisticated aesthetic that is both modern and welcoming.
Right lower: Color Palette
The use of natural materials such as wood and greenery adds warmth and texture to the space, while accents of black or darker hues provide contrast and depth. The resulting effect is a timeless and sophisticated aesthetic that is both modern and welcoming.
Design Philosophy and Influences for Urban Dining Space Garage Metamorphosis
Jump to:
Sponsored by Photowall: Bringing the Lilacs Grail Mural to Life
Sponsored by Photowall: Bring the Lilacs Grail Customized Wall Mural To Life
Pictured below, advertising image by Photowall for the Lilacs Grail mural

Photowall
Photowall, our sponsor for this project, believes your walls hold immense power to influence how you feel in your space. That's why they offer a vast collection of stunning wallpaper and canvas prints to ignite your creativity and bring your vision to life.
Just like we handpicked the captivating Lilacs Grail mural to transform my client's garage into a chic entertaining space, Photowall empowers you to tell your story through your walls.
Their extensive collection features designs from emerging artists, established brands, and talented illustrators.
Whether you crave floral elegance like the Lilacs Grail or yearn for a bold geometric statement, Photowall has something to ignite your design spark.
ABOUT PHOTOWALL
Founded in 2006 by two passionate brothers, Photowall embarked on a mission to revolutionize wall art.
Their innovative spirit led them to digital printing, opening doors to a world of personalized possibilities.
Today, Photowall is a flourishing company driven by a constant desire to explore new ideas and fuel your self-expression through high-quality, custom-made products.
Photowall champions the belief that "being more personal makes life more fun."
Their commitment to quality and environmental responsibility shines through everything they do.
Eco-Conscious Manufacturing
Photowall prioritizes sustainability. They produce only what's ordered, minimizing waste. Their eco-friendly inks are biodegradable and free of harmful chemicals.
Fire Safety Certified
Rest assured, all Photowall wallpapers meet fire safety regulations, providing peace of mind for your space.
Their in-house production facility in Stockholm ensures meticulous attention to detail, while their dedication to sustainability gives you peace of mind.
With stellar customer service and rave reviews for exceptional product quality, Photowall is your one-stop shop to turn your vision into a reality. Let's create a space that speaks volumes about you, together.
DESIGN YOUR DREAM MURAL WITH PHOTOWALL: A STEP-BY-STEP GUIDE
Photowall makes creating a custom mural for your space simple and fun! This guide will walk you through the process, from selecting your perfect design to placing your order.
Step 1: Unleash Your Inner Artist - Select Your Mural
Browse Photowall's extensive collection of stunning designs, or upload your own photo or illustration.
Find the perfect piece that reflects your unique style and complements your room's vibe.

Photowall
Step 2: Measure Twice, Cut Once (Not Really, We Do the Cutting!)
Accurate measurements are key to a flawless mural. Grab a tape measure and take several measurements from different spots on your wall's width and height.
Remember, walls aren't always perfectly straight, so measure in several places and use the longest measurement when placing your order.
Pro Tip: For a smoother installation process, Photowall recommends adding an extra 2.5-4 inches to your measurements when placing your order. This buffer provides some wiggle room for trimming and adjustments.

Photowall

Photowall
Step 3: Customize Your Masterpiece (Optional)
Photowall allows you to further personalize your mural! If you want to mirror the image or make slight adjustments, you can do so before finalizing your order.
Step 4: Choose Your Quality Preference - Standard or Premium
Photowall offers two high-quality options:
Standard: This classic and durable choice is perfect for most applications.
Premium: For enhanced resistance to wear and tear, a matte finish, and easier cleaning, select the premium option.

Photowall
Step 5: See it to Believe it - Check Your Crop
Before adding your masterpiece to the cart, take a final look at the image preview to ensure the cropped section aligns with your vision.

Photowall
Step 6: Add to Cart and Checkout
Once everything looks perfect, add your custom mural to your shopping cart and proceed to checkout.
Step 7: Relax, We'll Take it From Here - Placing Your Order
That's it! Photowall handles the rest. Your order will be shipped within 1-4 days with free shipping included.
EASY INSTALLATION FOR FLAWLESS RESULTS
Photowall provides everything you need for a smooth installation process. Your wallpaper will arrive pre-cut, numbered for easy hanging, and accompanied by detailed instructions and all the necessary tools, including glue!
Photowall takes the hassle out of installation. Here's a quick rundown of the process:
Numbered Strips: Your wallpaper will arrive pre-cut into numbered strips for a smooth and sequential hanging experience.
Glue Straight to the Wall: No need for messy pre-pasted wallpaper. Simply apply the wallpaper paste directly to your wall using a roller or brush.
Hang Edge-to-Edge: Carefully hang each numbered strip of wallpaper, ensuring a seamless edge-to-edge application.
Trim and Admire: Once all strips are in place, use a cutting tool to trim any excess wallpaper for a polished look. Congratulations, you've brought your dream mural to life!
ADDITIONAL RESOURCES:
Detailed Measuring Guide: For a deep dive into measuring your wall, check out Photowall's comprehensive guide.
Assembly Instructions Download: Feeling unsure about installation? Download Photowall's clear and concise assembly instructions for a stress-free process.
Assembly Kit Option: Photowall offers an optional assembly kit that includes all the tools you need for a seamless installation.
Transform Your Space Today!
With Photowall's vast selection, easy customization options, and commitment to quality and sustainability, creating your dream mural is within reach. Visit Photowall today and unlock a world of creative possibilities for your space!
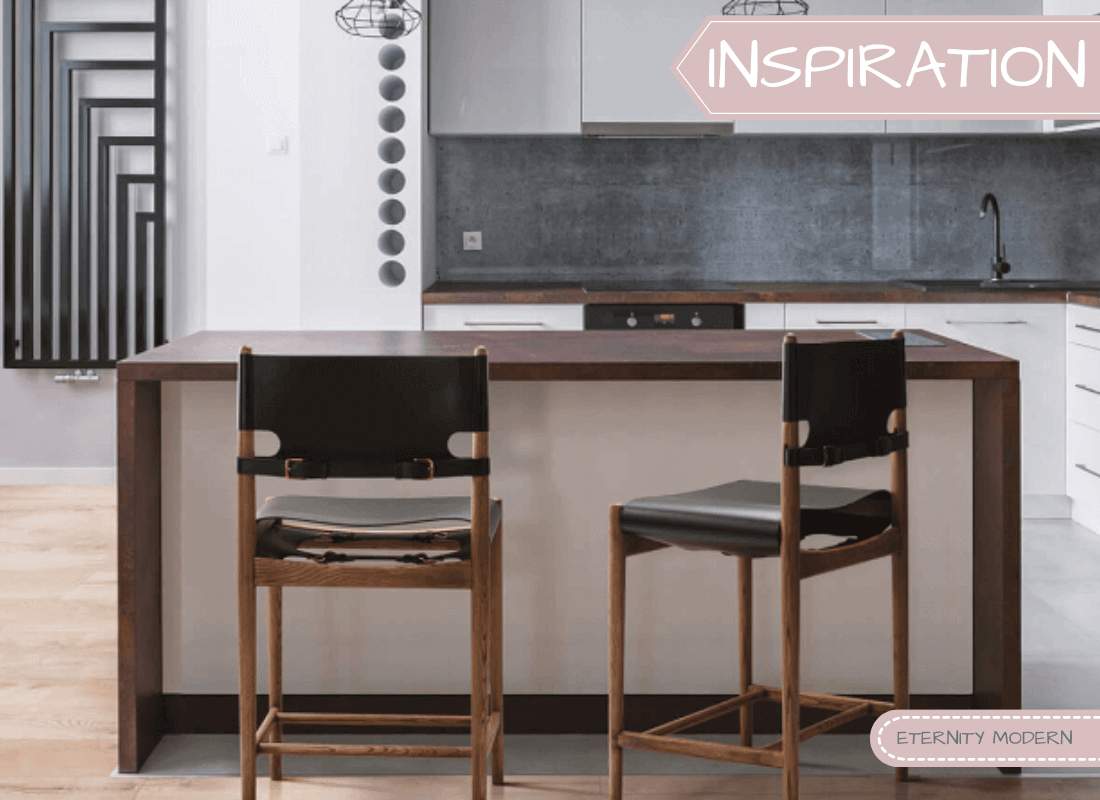
Japandi Influence: Merging Minimalism and Rustic in This Converted Garage

Japandi Inspiration: Harlan + Holden Glasshouse Cafe designed by Danish studio GamFratesi, as featured on TrendHunter.
Let's start with the Japandi influence, a harmonious blend of Japanese minimalism and Scandinavian serviceability.
Check out this inspirational Japandi style dining area, above, in the Harlan + Holden Glasshouse Cafe designed by Danish studio GamFratesi, as featured on TrendHunter.
Picture simplicity at its finest, where the thoughtful integration of natural materials and greenery creates a serene atmosphere, exemplary for socializing.
This aesthetic serves as our guiding light, transforming an often-underutilized space into a versatile, multipurpose area that adds both practicality and style to the home.
The Japandi style can be evident in our project, as seen in upcoming “AFTER” photos, with:
the black, simplified dinnerware
the addition of faux fern greenery down the center of the dining table and amongst beams
the useful sleek, black folding chairs
the clean lines of the transformer dining table which converts from a console to an area that seats twelve

What to know more? What is Japandi and how to get it right
Industrial and Mid-Century Modern Touches: Sleek Garage Revamping
Now, let's dive into the synergy of industrial and mid-century modern touches.
This is where the boldness of industrial design meets the nostalgia of mid-century elements. Imagine exposed beams and metal finishes injecting an edgy energy into the space.
The careful decisions in design convert a basic garage into a sophisticated retreat, reminiscent of industrial loft aesthetics.
Think DIY garage storage ideas that not only provide creative organization solutions but also seamlessly fit into the overall savoir-faire.
The juxtaposition of raw, unrefined details against sleek furnishings creates a character that is both grounded and en vogue.
Industrial style is evident in our project with (see “AFTER” photos):
the exposed beams
the butcher block countertop
the wood shelves above the countertop
wood transformer table
the industrial style shelving (hidden behind curtains)
copper accents
painted black concrete floor
Mid-century modern style is evident in (see “AFTER” photos):
the vintage brass accents on the floating shelves including:
teapot
mouse figurine
glassware
cake stand
black metal candlestick holders
practical black metal folding chairs
the clean lines and multi-use capability of the transformer console turn dining table


Want to learn more? Blending Industrial and Mid-Century Modern
Grandpa Chic Inspiration: Adding a Vintage Twist

Delving into sentimental territories, we embedded 'Grandpa Chic' allure into my client's design plan.
Imagine heirloom furniture, such as masculine black Windsor chairs, contrasted with a floral mural, and vintage string lights - a revival of tradition with a chic twist, creating a familiar yet fresh vibe.
Vintage pieces like the whiskey barrel serve as a testament to the historic distilleries of Washington state.
By implementing makeover ideas like these, one can even transform a garage into an elegant hangout dwelling, guaranteeing every square foot tells its own tale.
The result is a space-infused nostalgia, creating a cozy, recognizable atmosphere that invites guests to linger.
Grandpa chic style is evident in (see “AFTER" photos):
moody color palette
velvet curtains
quirky animal heads
charming wall mural
the art print “Fools Folly” by artist Goya Y Lucientes Francisco De
copper accents
exposed wood beams


Want to learn more? What is Grandpa Chic Trend?
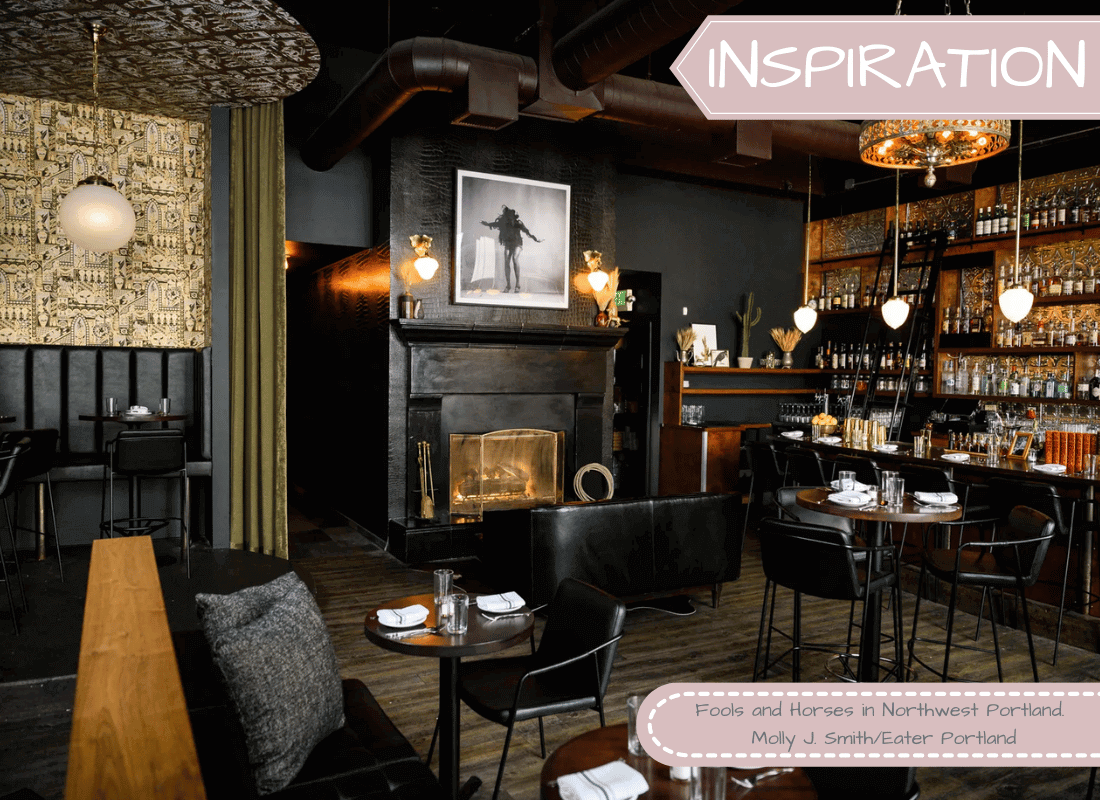
Retro Glam
FOOLS AND HORSES IN PORTLAND
My client is obsessed with the interior of the Portland establishment Fools and Horses.
Collin Nicholas, the owner of Fools and Horses bar, ensures that the space offered intimate seating arrangements, creating smaller, cozier hubs around the room.
The bar area, in particular, exudes a "living room sort of energy," with a sleek black leather couch positioned in front of a welcoming fireplace.
Within the restaurant, darker tones create a sultry and sophisticated atmosphere, while the brightness of the bar area adds a dynamic contrast.
Light reflects off the pressed tiles lining the walls behind the bar, enhancing the ambiance. As Collin describes, Fools and Horses embodies a dark, sultry vibe, perfect for meaningful conversations at the bar.
Aligning with Collin Nicholas's philosophy of a highly stylized aesthetic serving as the North Star for both menu and space, the goal here is to create a cohesive and inviting experience, prioritizing comfort and intrigue in every design choice.
Sources: pdxeater.com and luxesource.com
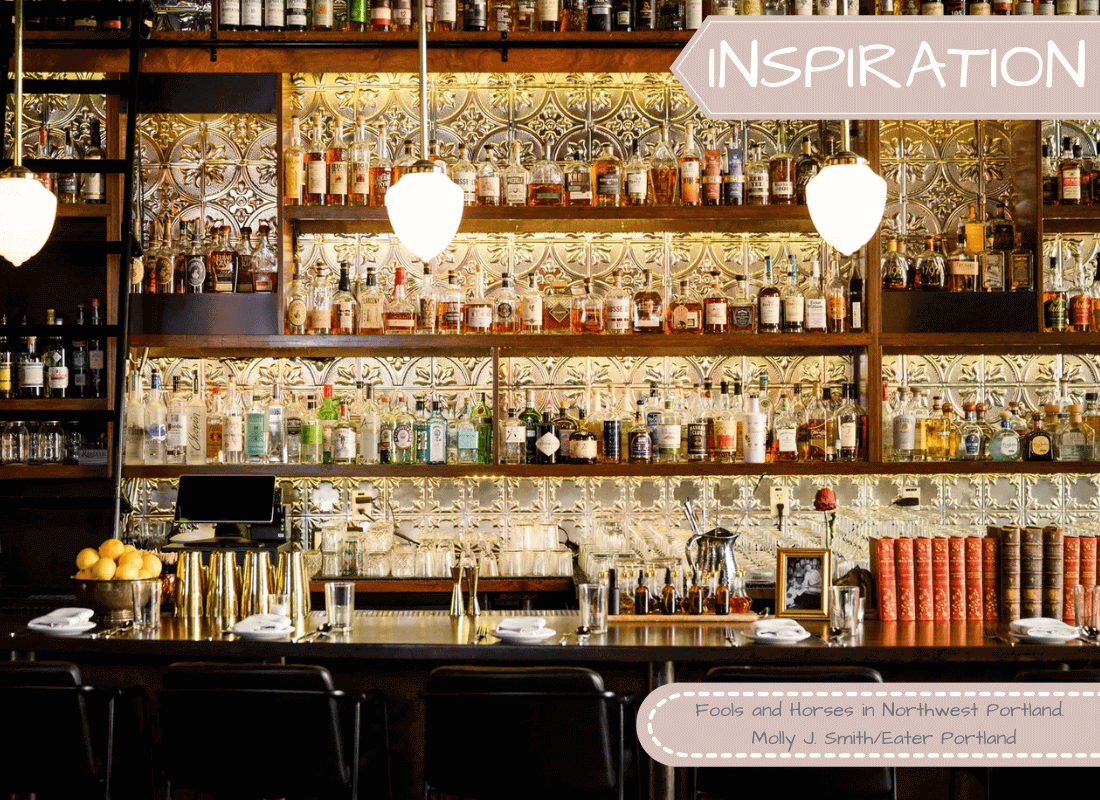
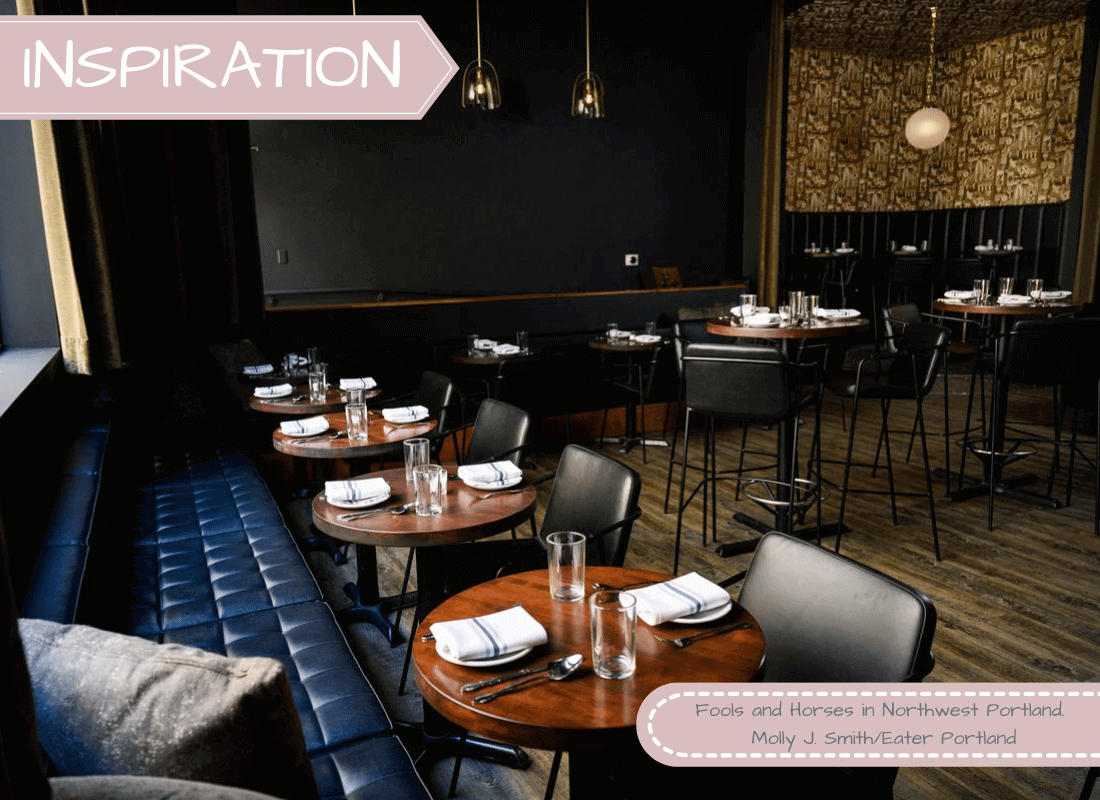
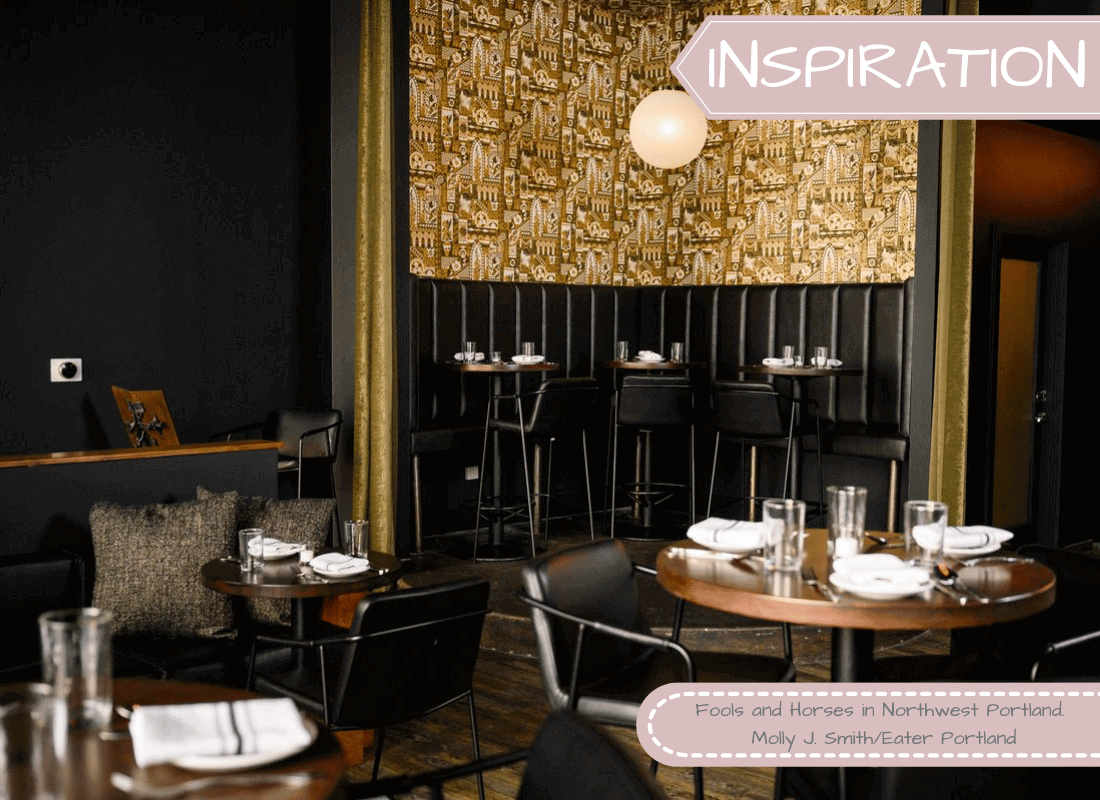

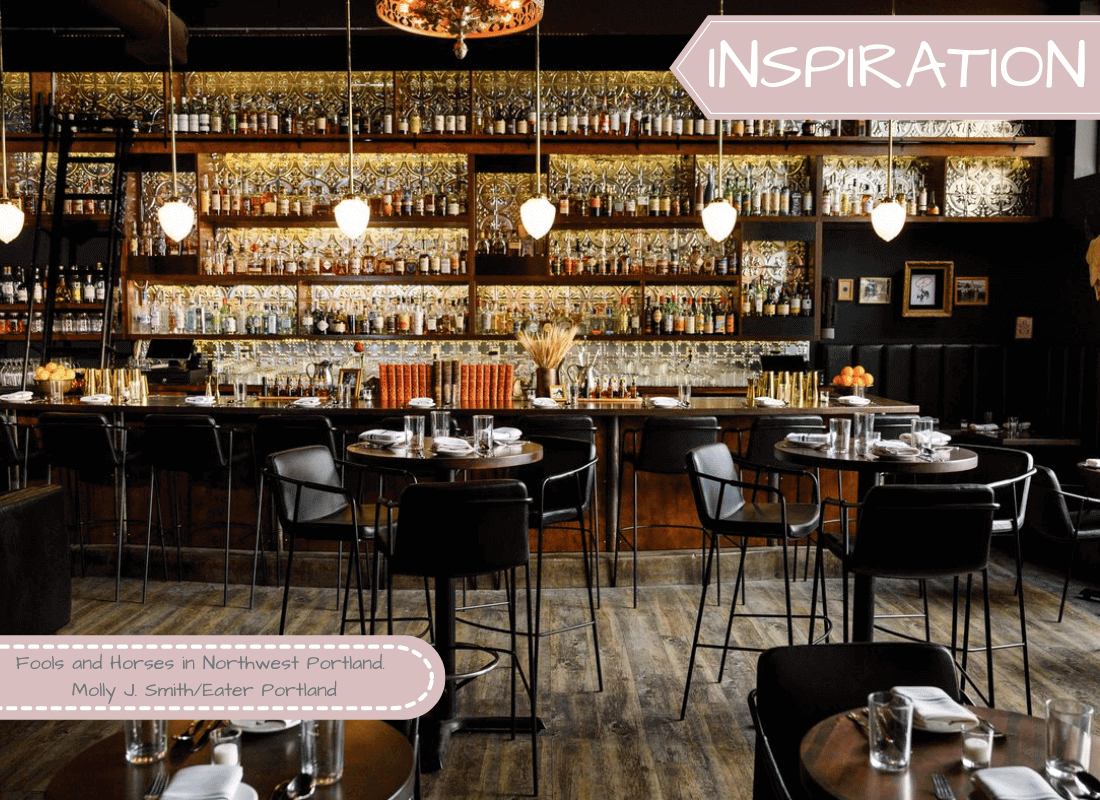
INTEGRATING THE STYLE INTO OUR GARAGE CONVERSION PROJECT
Drawing from the retro glam ambiance of Fools and Horses, known for its emphasis on subtlety and elegance, the garage conversion project mirrors the same principles.
Luxurious details, such as the wall mural reminiscent of the custom wallpaper by Lonesome Pictopia, set the mood.
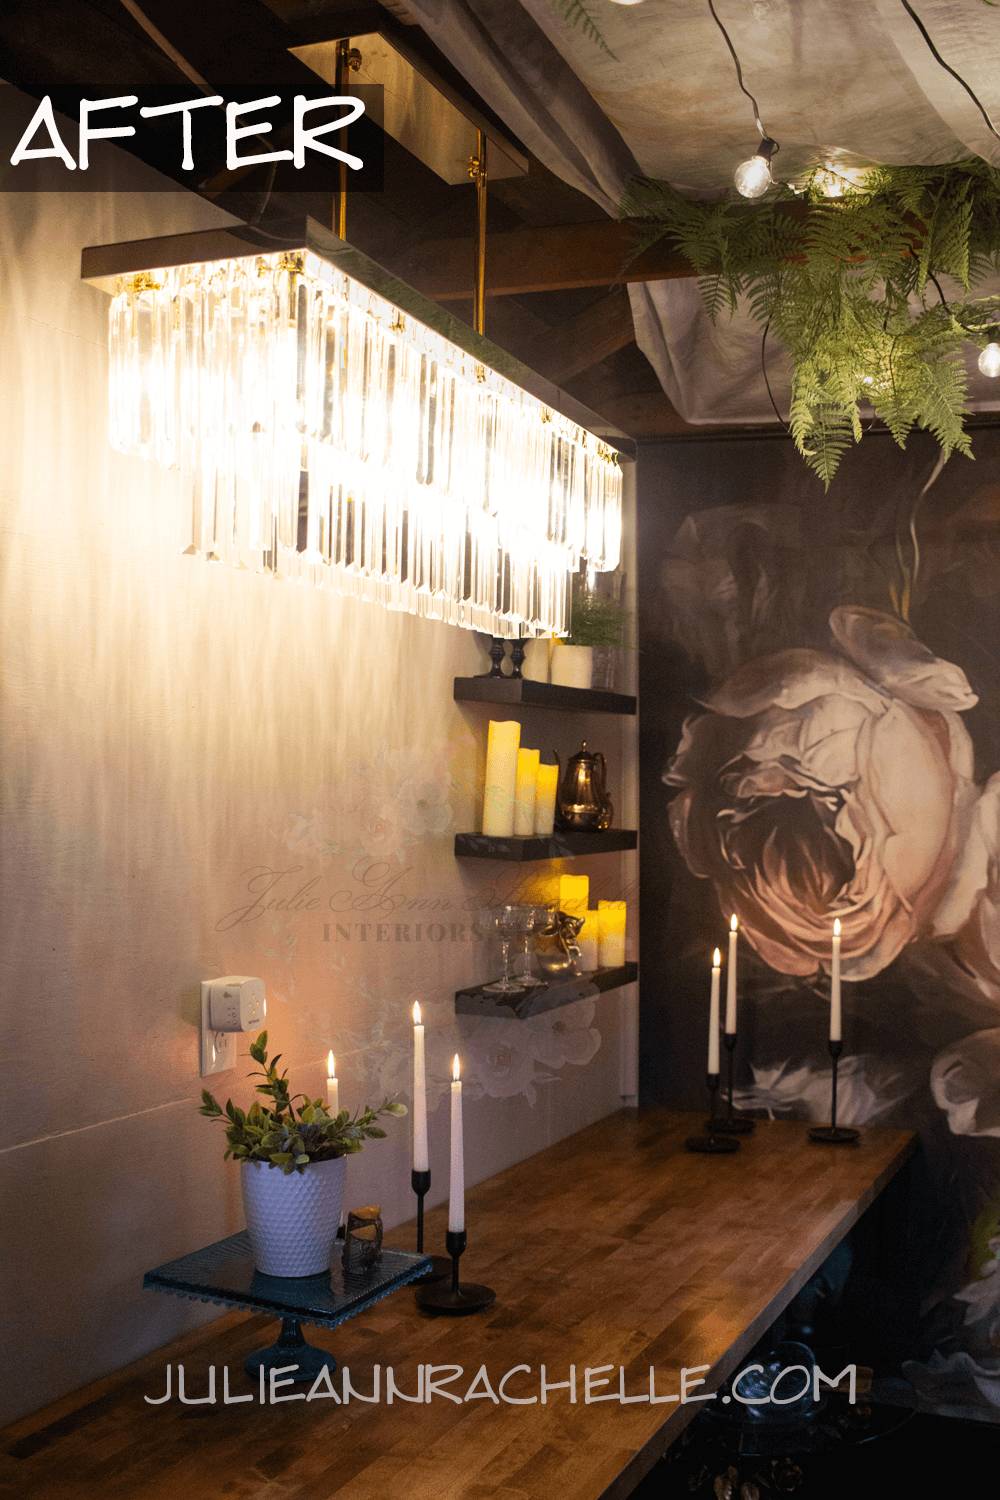
A statement chandelier over the countertop introduces a touch of glam, while moody blacks contribute to the overall allure.
What is retro glam?
Retro glam interior design style combines elements of vintage aesthetics with a touch of luxury and sophistication.
It often draws inspiration from the mid-20th century, particularly the 1950s and 1960s, embracing bold colors, geometric patterns, and glamorous details. Here are key characteristics of retro glam interior design:
Vintage Influences: Incorporation of iconic furniture pieces and design elements from the mid-century era, such as sleek lines, tapered legs, and bold patterns.
Bold Colors: Vibrant and daring color palettes, including shades like deep blues, emerald greens, and rich reds. These colors add a sense of drama and opulence to the space.
Luxurious Materials: Use of luxurious materials such as velvet, brass, chrome, and mirrored surfaces to enhance the overall glamorous feel.
Geometric Patterns: Emphasis on bold and eye-catching geometric patterns, including chevron, herringbone, and other intricate designs.
Statement Lighting: Incorporation of distinctive and often oversized lighting fixtures, chandeliers, or pendant lights that serve as focal points in the room.
Reflective Surfaces: The inclusion of mirrored or glossy surfaces to create a sense of glamour and sophistication. Mirrored furniture and accessories are common in retro glam design.
Art Deco Elements: Some overlap with Art Deco design, including elements like geometric shapes, symmetry, and ornate detailing.
Mix of Textures: Combining different textures, such as fur, velvet, and metallic finishes, to add depth and tactile interest.
Concept and Mood Presentation
Additional Inspirational Images Considered During Concept Development

Grandpa Chic represents the power of nostalgia. It incorporates classic furnishings, retro patterns, and a sense of history. This style brings comfort and a touch of timeless elegance to interiors. It's about embracing the charm of bygone eras while incorporating these vintage elements into contemporary design, creating a space with character and a nod to the past.
Gallery of our concept inspiration images
Click to enlarge


Color Palette and Materials
Materials Samples Presentation

Mural: Lilacs Grail, Premium, W189xH86
Area Rug: Gold Black Washable Bordered Indoor Outdoor, Polypropylene, Size 10'X14'
Walls: Behr Smokestack
Faux Hide Rug: Color: Off-white, brown; Machine Washable , 0.8" Pile Height, L96" x W60"
Floor: Behr Limosine Leather
Slipcover Fabric: Color: Black, Satin, W44xH46
Wall Decor: Animal Head Trophies, Bronzed Resin, Rabbit, W5xH10

Top row, L to R: Jitney, Dimity, Wevet, Treron
Bottom row, L to R: Pointing, Lichen, Mouse, London
In this chic dining transformation, envision a moody dance of earthy greens, beiges/browns, and bold blacks.
We're not just talking about colors; we're talking about the materials that make this space pop.
Witness wood, painted concrete, and brushed metals coming together to create a vibe that's both luxurious and timeless.
The walls, adorned in the soothing Behr Smokestack paint, set a peaceful backdrop, playing with light and shadow to add an airiness to this earnest room.
My client painted the floors a rich Behr Limousine Leather floors grounding the space, and there are strategic pops of pink, blue, charcoal, and greige injecting lively vibes.
Of course, let's not forget the metallic accents, from antique gold to matte black, adding that touch of class and pulling everything together into a cohesive and elegant look.
Material Finishes Presentation

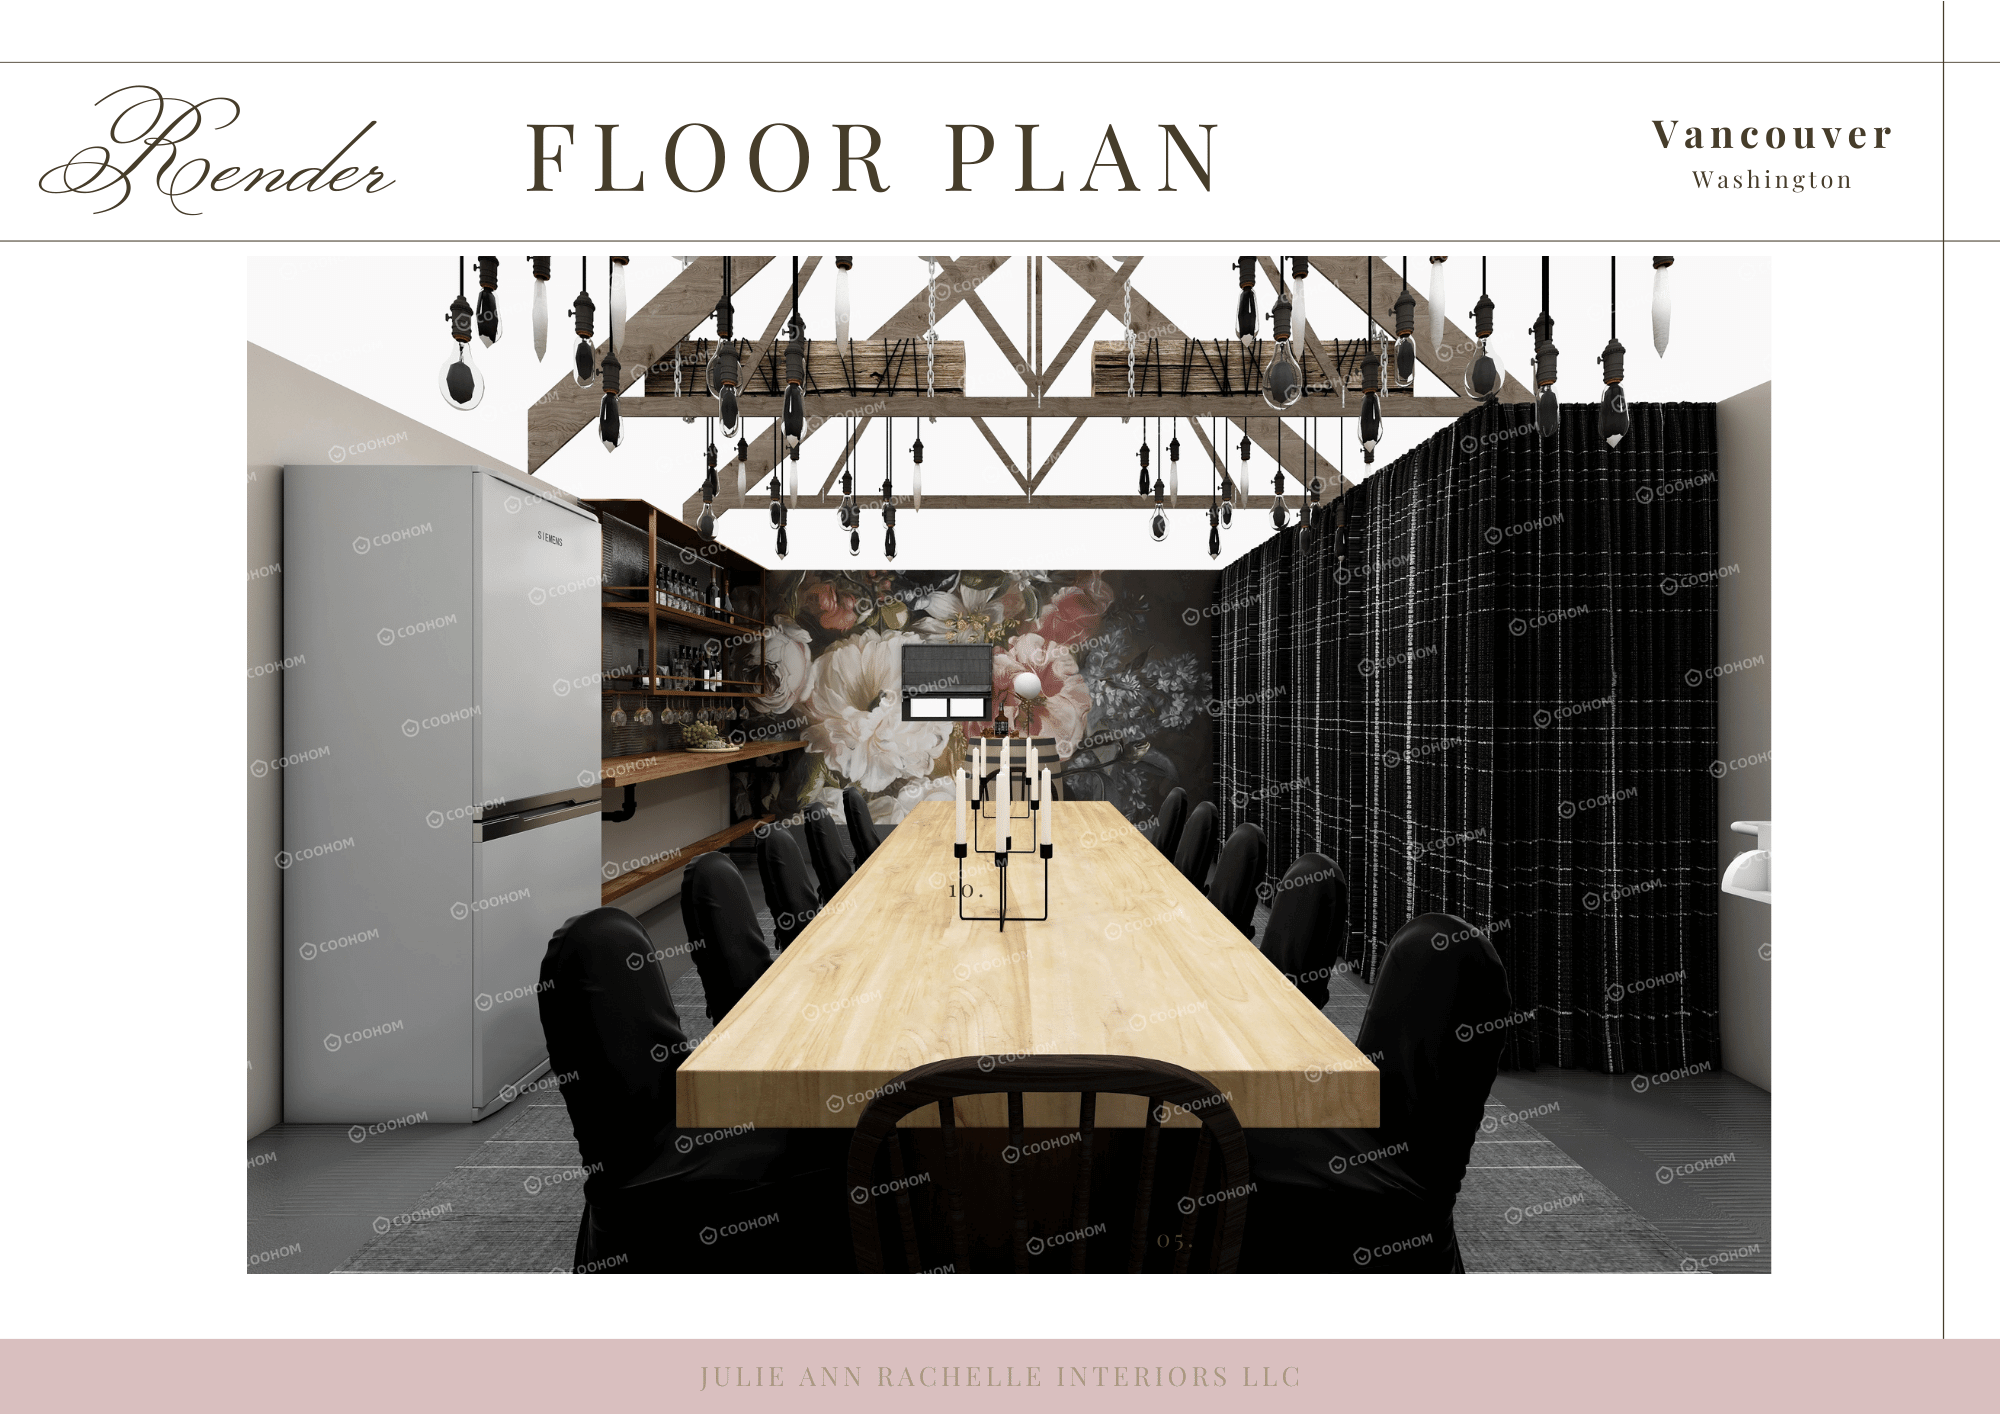
Floor Plan Presentation

In the center of the presentation above, we see a bird’s eye view of the floor plan.
The overhead garage door is along the right wall, the entry door is in the bottom right corner.
A living wall of greenery was planned to go on the wall to the right of the overhead garage door.
Along the bottom wall, we see a fridge with a countertop to the left.
Along the left wall, we can see the floral mural.
Along the top wall, we see the industrial shelving hidden by curtains, with the grill to the right. Artwork is above the grill.
In the center of the room is the client’s transformer table surrounded by folding chairs, with Windsor chairs at the heads of the table.
The upper left corner of the presentation shows an image of the dining table, displaying the corner where the wall mural meets the curtained storage for shelving and bikes mounted on the wall.
To the right of the floor plan, a 3D rendering shows the view from the head of the table looking towards the wall mural. While gold metal shelving was proposed, the client chose to go with floating shelves.
In the lower left corner is the 3D photorealistic rendering of the corner where the mural meets the countertop. A swatch of the paint colors for the floor and wall, respectively, overlap this image.
Along the lower right corner, the color palette for the project is echoed.
Functional Spaces Design in Garage Makeover to Living Space
Counter Serving Area in This Transformed Garage
Now, let's talk functionality. Imagine a butcher block counter beauty, ready for food presentations and preparations for lively gatherings.
What makes it even better? It smoothly transitions into a serving area, complemented by a strategically placed modern fridge for easy access to refreshments.
In addition, gold and brass gold elements, turn the ordinary into something extraordinary. This creates a hub for culinary adventures and friendly chats.
If my client wants to take things to the next level, I suggest adding a sleek, modern heat pump to maintain a cozy atmosphere during colder seasons.
This is a “BEFORE” image of the garage. The workbench to the right of the freezer is where the butcher block countertop was installed.

Photo: C. Sidhom
The image below is the “AFTER” result of the counter serving area.

3D Photorealistic Rendering of Floor Plan
The next three images include, in order, my floor plan rendering, then the completed “AFTER” result, contrasted with the “BEFORE.”
3D Photorealist Floor Plan

“AFTER” of the view as the above rendering

“BEFORE” & “IN PROGRESS”
( similar angles of Above “AFTER”)

Photo: C. Sidhom

Photo: C. Sidhom
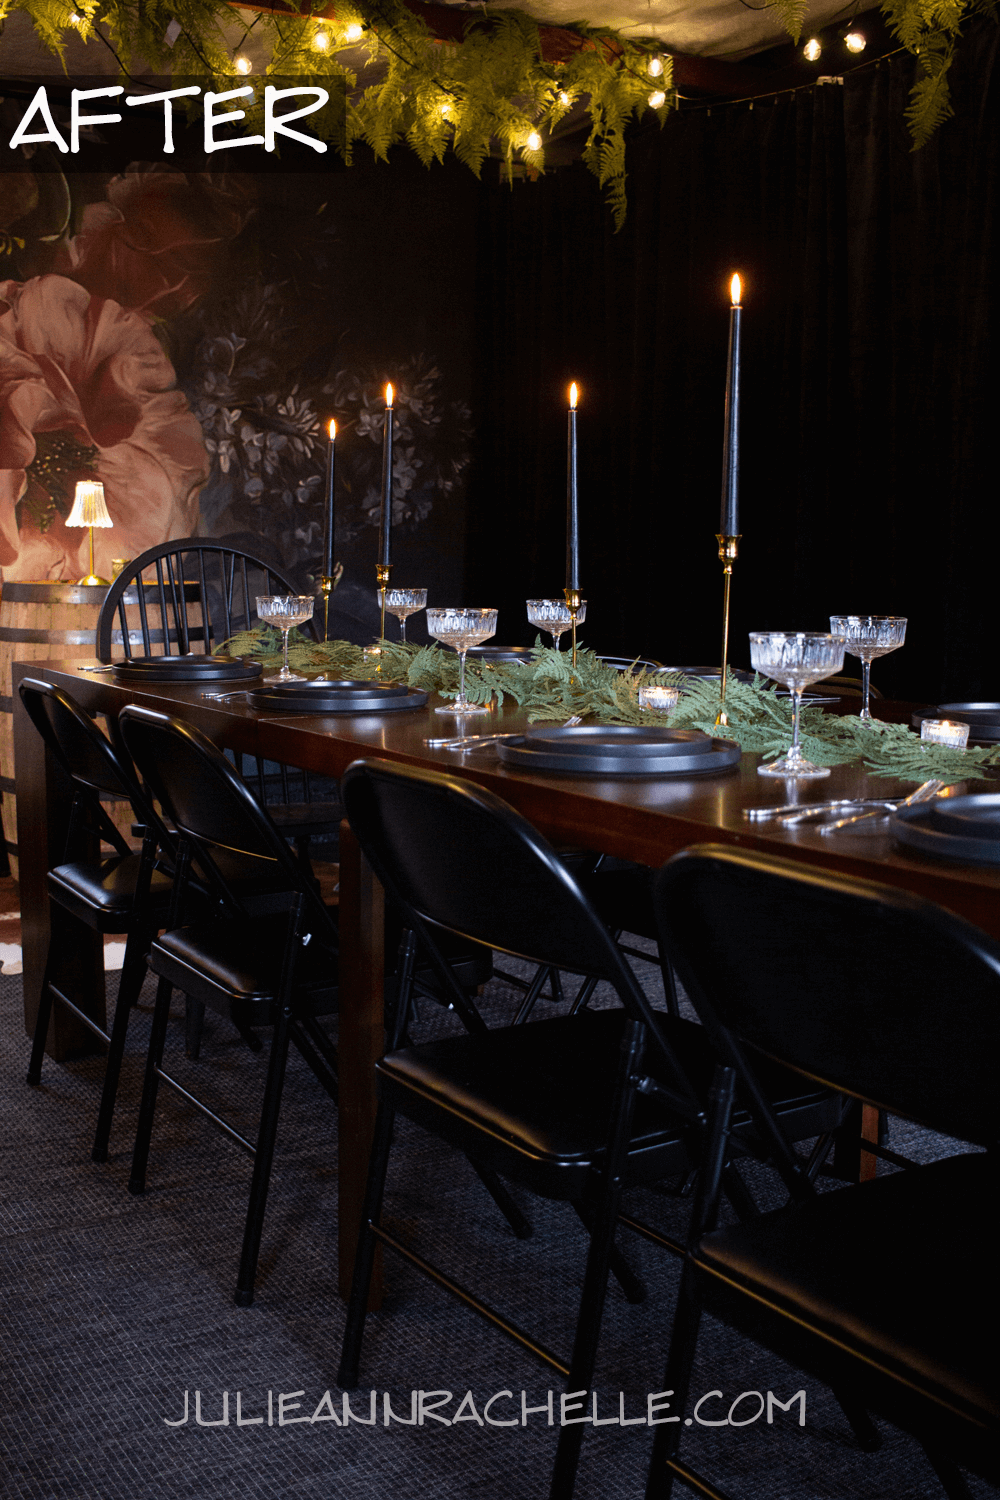
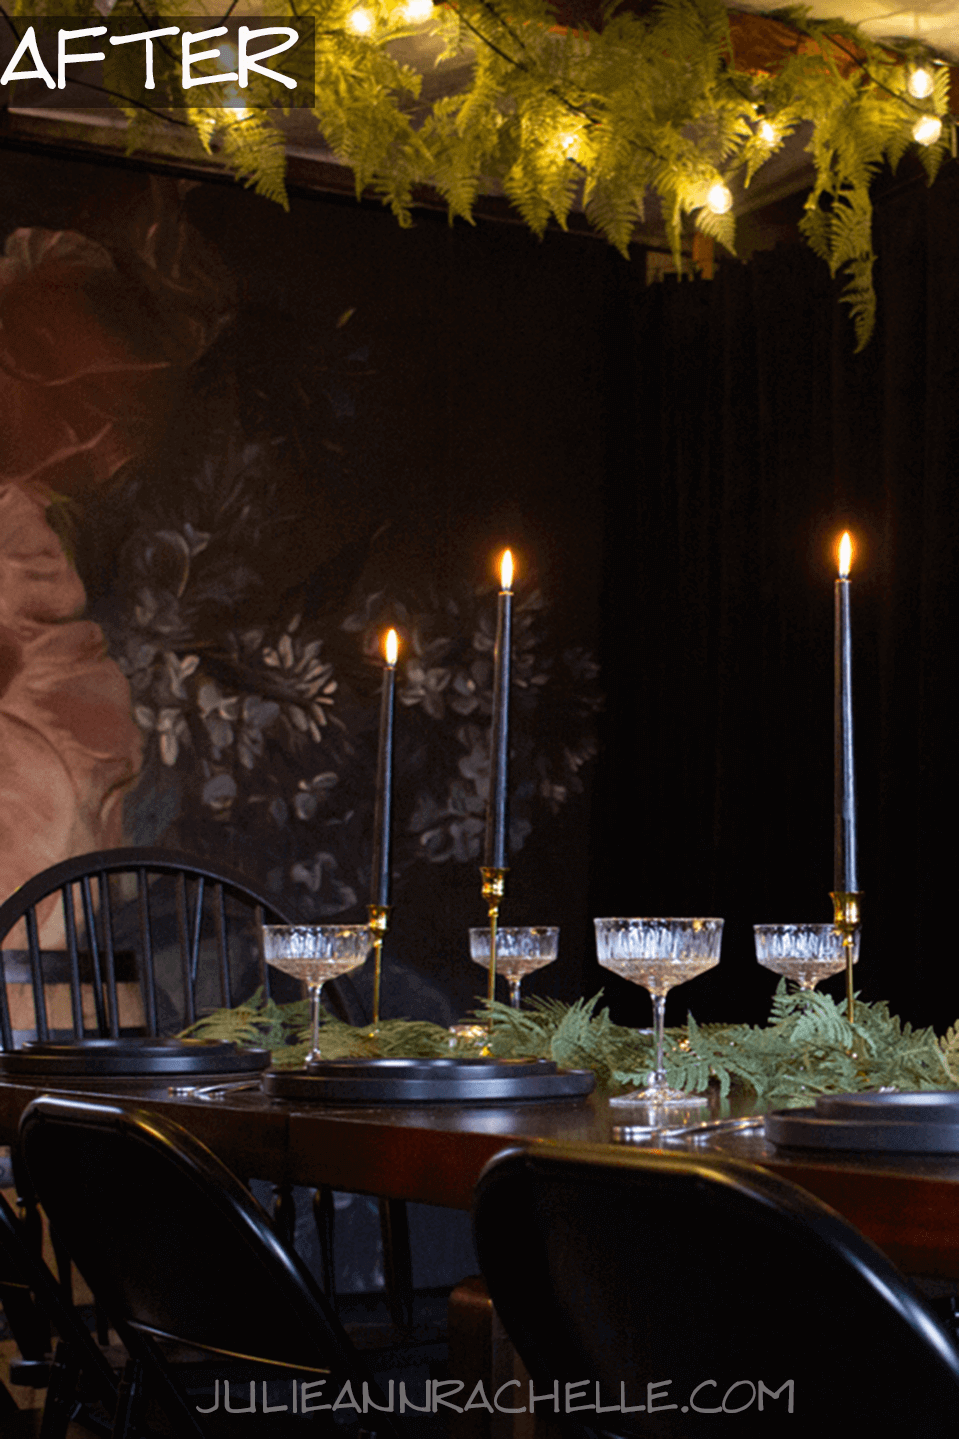
Cozy Dining Area for a Warm Ambiance
Next to the culinary hub, the seating and dining area champions both comfort and conviviality.
Practical, easily slipcovered, folding chairs mingle with inviting Windsor chairs, a testament to both fine dining and the pleasure of good company.
This versatile area, thanks to the converter table, adapts fluidly to the ebb and flow of gatherings, ensuring that whether the occasion calls for intimate discussions or larger celebrations, the harborage remains welcoming and accommodating.
The dining area beckons guests to unwind and engage, with sleek, black folding chairs and black Windsor chairs at the heads of the table, each piece carefully chosen to foster an environment of comfort and connection.
The next two images are my 3D photorealistic rendering followed by an “AFTER” photo of the same view.
3D Photorealistic Rendering Facing the Mural
Project Name: Vancouver Garage Finish
Design: Julie Ann Rachelle Interiors LLC
“AFTER”
photo of a similar angle as above rendering

“AFTER”
photo of a similar angle as above

Storage Area Ingenuity: Clever Idea for Garage Finish
Open oak shelves and industrial options offer accessible and visually appealing storage, maximizing efficiency.
Hidden industrial shelving behind moody black curtains keeps the area organized and clutter-free, ensuring all items have a designated spot.
This blend of open and concealed storage maximizes vertical space, with each choice, from shelves to curtains, echoing the project's theme: marrying function and style.
The following images include:
3D photo-realistic rendering of the hidden storage and grill
“AFTER” image of the same angle
“IN PROGRESS” photos of the same angle as above
“BEFORE” photo of the grill storage area (grill to be used outside only)
“BEFORE” photo of the grill storage area (grill to be used outside only)
3D photo-realistic rendering
of the hidden storage and grill

Project Name: Vancouver Garage Finish
Design: Julie Ann Rachelle Interiors LLC
“AFTER”
image of the same angle as above

“IN PROGRESS”
photos of the same angle as above

Photo: C. Sidhom

Photo: C. Sidhom
“BEFORE”
photo of the grill storage area
(grill to be used outside only)

Photo: C. Sidhom
“AFTER”
photos of the grill storage area
(grill to be used outside only)

V. Furnishing and Decor for Converting a Detached Garage
Furniture Selection Presentation

Project Name: Vancouver Garage Finish
Design: Julie Ann Rachelle Interiors LLC
Furniture Selection for A Garage Turned into Entertaining Space
The judicious selection of furniture plays a crucial role in narrating the bonus room's story. Incorporating items that cater to both aesthetics and practicality naturally enhances the metamorphosed chamber.
The transformer table, with its ability to adapt to the needs of the gathering, and the whiskey barrel table, with its unique charm and speaking of the connection to Washington state’s distillery industry, stand out as testaments to the fusion of form and function.

transformertable.com

Each piece is chosen not just for its aesthetic appeal but for its contribution to the overarching design theme, embodying elegance, history, and versatility.
“AFTER”

Decor andDecor and Accents: Aesthetic Garage Upgrade Decorative Ideas
The interior is brought to life by beginning with strategic decor choices such as a simple, creative DIY makeover.
We transform a plain wall into a canvas with personality by incorporating a statement mural. This serves as a visual anchor that draws in the eye and captivates the imagination.
Curated contemporary and vintage accessories infuses the area with personality and warmth, ideal for those contemplating a DIY garage conversion project.
These elements, carefully hand-picked, incorporate layers of texture and depth that enrich the overall affair. They invite guests to explore and engage with the space.

The art of details
The place comes alive in the details. A curated selection of decor - Japandi-style dinnerware, contemporary art, and tactile textiles - enchants the eyes and elevates the room's essence.
Each accent acts as a brushstroke in the grand painting of this chic dining escapade.


VI. Illuminating the Converted Garage
Lighting Design: Brightening Up This Chic Dining Space

Here, we've orchestrated a constellation of fixtures: beginning with a statement chandelier gracing the countertop joined by a chorus of candles.
This symphony of light grants the setup versatile ambiance, ensuring a warm and heartfelt glow at any hour.
Layering light sources creates visual depth and enhances the environment, highlighting architectural details.
Further enchantment comes courtesy of string lights nestled among the beams, paired with strategically placed faux greenery.
This interplay creates a soft, tranquil atmosphere, where every moment feels imbued with a touch of magic.

VII. Implementing the Design for Garage Room Rehab Idea
Project Planning and Execution for Garage Makeover
Every element, from design sketches to timelines, was carefully choreographed.
A detailed execution plan ensured each phase unfolded with precision, transforming the chic dining area from concept to captivating reality.
For enhanced communication throughout the remote virtual eDesign project—a hallmark of effective DIY makeovers—a user-friendly, private, online portal was created to track progress and communicate updates.
Transforming a garage into a haven of style and function is a collaborative journey.
This commitment is woven into the project, where home improvement dreams materialize.
Working hand-in-hand with the client, I ensure every element aligns with their aspirations, crafting a result that surpasses expectations. My role extends beyond execution, fostering their DIY skills and empowering them on this journey.

Sourcing Materials and Furnishings for the Garage Entertaining Space Redesign
Sourcing materials and furnishings became a treasure hunt for unique and exquisite pieces.
Each item was recommended not just for its beauty or purpose, but for the story it would weave into the layout, echoing the rich history held within this classic bungalow's garage.
Quality, style, and affordability guided the selection process.
Rugs were meticulously approved for comfort and cleanability while remaining robust enough for the high traffic of an entertaining area.
This meticulous curation process is essential in crafting an abode that truly resonates with life.

My Client's Thanksgiving Vision: From Garage to Chic Dining
My client yearned for a reimagined garage to serve as the heart of their Thanksgiving celebration.
This space, envisioned as a haven for cherished family traditions and new memories, guided individual design choices, infusing the renovation with the spirit of togetherness and joyous celebrations.
The radical change culminates in a Thanksgiving dreamscape that embodies the essence of gathering and gratitude, while seamlessly integrating storage remedies within the room's structure.
The tablescape, adorned with verdant greenery, flickering candles, and the refined verve of Japandi dinnerware, set the stage for festive memories.
This overhaul showcases the versatility and warmth of the newly improved nest, revealing the immense feasibility of a garage beyond a mere place to store boxes.

Unveiling the Potential of Your Garage Space for an Entertaining Area
Why Your Garage Might Need a Makeover?
Your garage may well need a rehaul for reasons more than mere aesthetics.
Considering the average garage makeover cost, it's about smart investing in your property's value.
It's about reclaiming a neglected space, transforming it into a functional area that harmonizes with your lifestyle; whether it becomes a chic dining spot, an organized home garage remodel with storage resolutions, a home office, or a serene retreat.
Don't let valuable square footage go to waste when it can enrich your home and life. In many cases, homeowners have revised their garages into versatile multifunctional rooms, optimizing usage while enhancing the home's functionality.
Get Expert Help For Your Best Garage Finishing

The Benefits of Hiring a Professional for Your Chic Transformation
Opting for a professional garage overhaul can pay dividends in achieving a chic refashioning.
Experts in design and construction bring a wealth of experience, taking care that every aspect of the renovation from the initial concept to the final touches is executed flawlessly.
Apart from their prowess in optimizing your interior, their knowledge of the latest garage makeover costs is invaluable in planning your budget effectively.
They not only save you time and stress but can also foresee and mitigate possible challenges, turning your wishful thinking into an elegant reality with precision and grace.
COMPLIMENTARY DESIGN DISCOVERY CALL: Tailoring to Your Vision
Embarking on this transformative journey, a complimentary discovery call is the first step towards actualizing your chic dining area.
With a private online portal for eDesign clients, along with our streamlined design process, it's an opportunity to meld your dreams with professional mastery, maintaining all elements align with your conceptualization.
This bespoke approach lays the groundwork for a design that isn't just visually stunning but also a reflection of your individuality and lifestyle.
FAQ: Converted Garage Makeover into Chic Entertaining and Dining Area
Is it worth it to finish my garage?
Whether converting your garage is worthwhile depends on several factors:
Increased property value: Generally, a finished garage can increase your home's value, but the return on investment could vary depending on your local market.
Personal use: Contemplate how you'd utilize the finished space. Will it enhance your everyday living or just be used occasionally?
Finance constraints: Remodeling a garage can be costly. It's crucial to set a realistic allowance considering material choices, labor, and potential permits.
What are the steps involved in finishing a garage?
Finishing a garage typically involves several phases:
Planning: Create a clear vision, design, and budget.
Permits: Check with your local authorities to determine any required permits.
Demolition: This can involve removing debris or existing structures.
Construction: This includes framing, electrical wiring, insulation, and installing chosen finishes.
Final touches: Add flooring, paint, lighting, and desired features.
How much does it cost to finish a garage?
While it's difficult to give a definitive answer, finishing a garage can cost anywhere from $5,000 to $50,000+ on average. This wide range depends heavily on several attributes:
Desired level of finish: Basic cosmetic updates cost less than high-end materials and complex designs.
Materials preference: Budget-friendly supplies like paint and tile are cheaper than premium options like marble countertops.
Labor costs: Hiring contractors significantly increases the cost compared to DIY projects.
Local issues: Permitting fees and labor rates can vary significantly by location.
Here's a breakdown of likely costs:
Demolition and removal: $500 - $1,000
Flooring: $1,000 - $2,000
Walls and ceiling: $500 - $1,500
Lighting: $300 - $800
Furniture: $1,000 - $3,000
Storage solutions: $300 - $1,000
Decor and accessories: $200 - $500
Climate control (optional): $1,500 - $3,000
Appliances (optional): $500 - $2,000
Remember, this is just an estimate. For a more accurate assessment, deliberate:
Getting quotes from local contractors for materials and labor.
Setting a realistic budget that covers in all potential costs, including permits and unforeseen issues.
Determining the level of finish you desire and choosing products accordingly.
Can I finish my garage myself, or do I need to hire a contractor?
Whether you can finish your garage yourself or need to hire a contractor depends on several circumstances:
1. Skills and Confidence:
DIY savvy: Do you have experience with carpentry, electrical work, and plumbing - some of which might need a license? Are you comfortable tackling complex tasks like framing, insulation installation, and electrical wiring?
Confidence level: Are you confident in your ability to complete the tasks to a high standard, meeting safety regulations, and your desired quality?
2. Access to Tools:
Do you have or are willing to rent or purchase the necessary tools for demolition, construction, and finishing? This can include power tools, safety equipment, and specific tools for tasks like drywall installation or flooring.
3. Project Complexity:
Simple tasks: Painting, installing shelves, or adding basic flooring might be manageable for a skilled DIYer.
Complex projects: Plans involving electrical work, plumbing alterations, structural changes, or complex framing may require professional expertise due to safety concerns and building code compliance.
4. Timeline and Budget:
Time constraints: If you have a limited timeframe, hiring a contractor can ensure faster completion compared to DIY work.
Funds: While DIY saves on labor costs, factor in the probable cost of renting tools, purchasing materials, and correcting any mistakes.
Ultimately, the decision depends on your circumstances. If you lack the necessary skills, confidence, tools, or time, hiring a qualified and licensed contractor is recommended. They can ensure the remodel meets building code regulations, is completed safely and efficiently, and offers know-how for any unforeseen complications.
What type of flooring is best for a finished garage?
Considerations include durability, moisture resistance, ease of cleaning, and aesthetics.
Choose flooring that's durable, moisture-resistant, easy to clean, and complements the overall design (e.g., epoxy, tile, concrete).
What kind of insulation should I use to finish my garage?
Weigh your climate and intended use.
For year-round comfort, choose insulation with a higher R-value.
Do I need a permit to finish my garage?
Permit requirements vary by location, so consulting local authorities is crucial.
How can I incorporate storage solutions into a finished garage?
Optimize space by using vertical products like shelves and cabinets. Choose options that match the garage's style and practicality.
What are some creative ways to design a finished garage?
Seek examples online or from professionals.
Popular options include an in-law suite, home gyms, guest rooms, or chic entertainment areas.
Conclusion
This transformation from a mere garage to a haven of social connection and aesthetic delight is a testament to the power of thoughtful design.
It's a journey that showcases how a harmonious blend of design philosophies and styles can create quarters that are not just beautiful but deeply functional and welcoming.
As the project comes to life, it stands as a celebration of design's ability to enrich lives, honoring the past while crafting a space that is vibrant, inviting, and ready to host a tapestry of new memories.
This is not just a transformation; it's a journey into the heart of what makes an accomodation truly feel like home—warm, inviting, and brimming with stories yet to be told.
I encouraged my client to infuse their own creative ideas and personal preferences into the design to make their lodging truly their own.
By embracing the beauty of the Pacific Northwest and incorporating thoughtful design choices, this garage makeover project becomes a standout dining area that delights both the client and their guests.
You will enjoy these articles as well:
Gallery of Finished Garage Turned Chic Entertaining Space


Related Reading

Join the Conversation

Archive
Fresh Content