One Room Challenge Week 4 Progress: A Family Affair


Sponsored by Beddy’s and DesignFiles
Week 1 | Week 2 | Week 3 | Week 4 | Week 5 | Week 6 | Week 7 | Week 8
Transforming a bedroom into a sensory-safe haven might sound like a niche project, but when it's your nephew's world on the line, every detail matters. Join me, Julie Ann of Julie Ann Rachelle Interiors, as I dive into Week 4 of the Spring 2024 One Room Challenge. We're turning Logan's space into a personalized retreat that's as functional as it is comforting. Buckle up for a tale of family teamwork, unexpected DIY challenges, and interior design creativity that might just inspire your next home project.
Click to watch reel of this week’s video summary!
Where we began: Week 1

Week 2: Unveiling Stripes
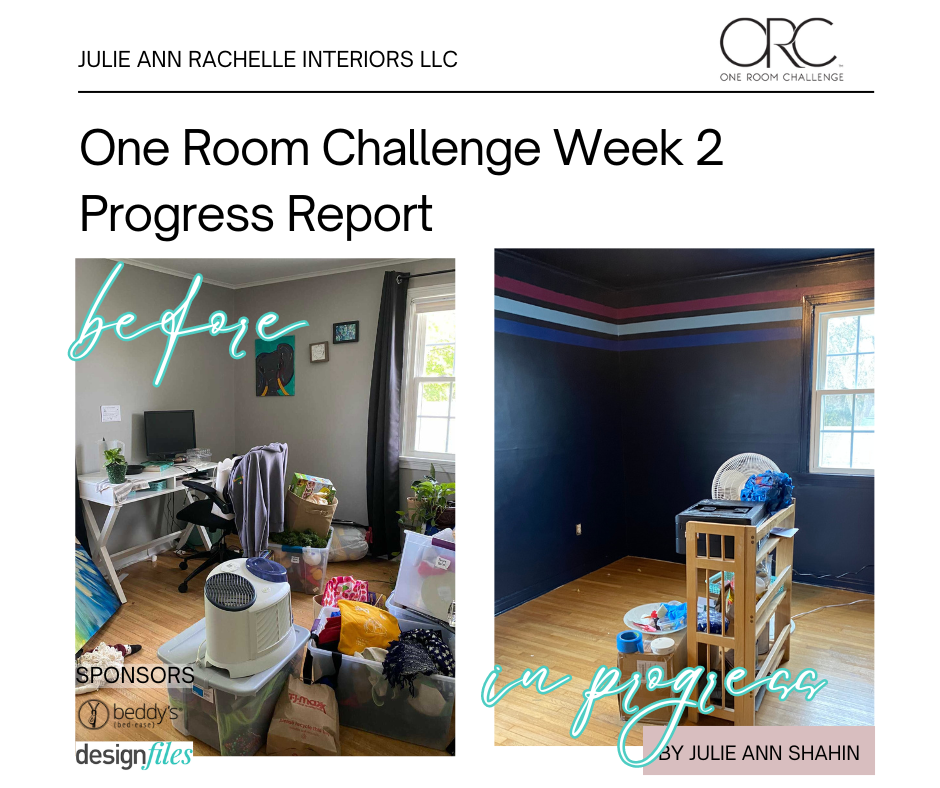
Week 3: Painting Tips and Concept Updates
Introduction
Hello! This week, I’m thrilled to share the fourth installment of our spring 2024 One Room Challenge series. If you're catching up, Logan, who's about to turn 13, lives a short drive from Rochester in a cozy home with his parents—my sister being his loving mother.
I suggest beginning with Week 1 to fully understand our goals for Logan's room. There you'll find a wealth of information, including before photos and our design inspiration.
Week 2 dives into our design plans and a video about painting stripes that add character to the room.
Week 3 is where you can learn about our unique lighting solutions and see progress photos of the painting. We promised something special, and we delivered.
Before we delve into this week's progress, take a moment to explore the contributions from other creative minds in this challenge. The community's creativity is inspiring, and their projects are definitely worth a look on the One Room Challenge website!

This Week's Update: Building Dreams and Beds
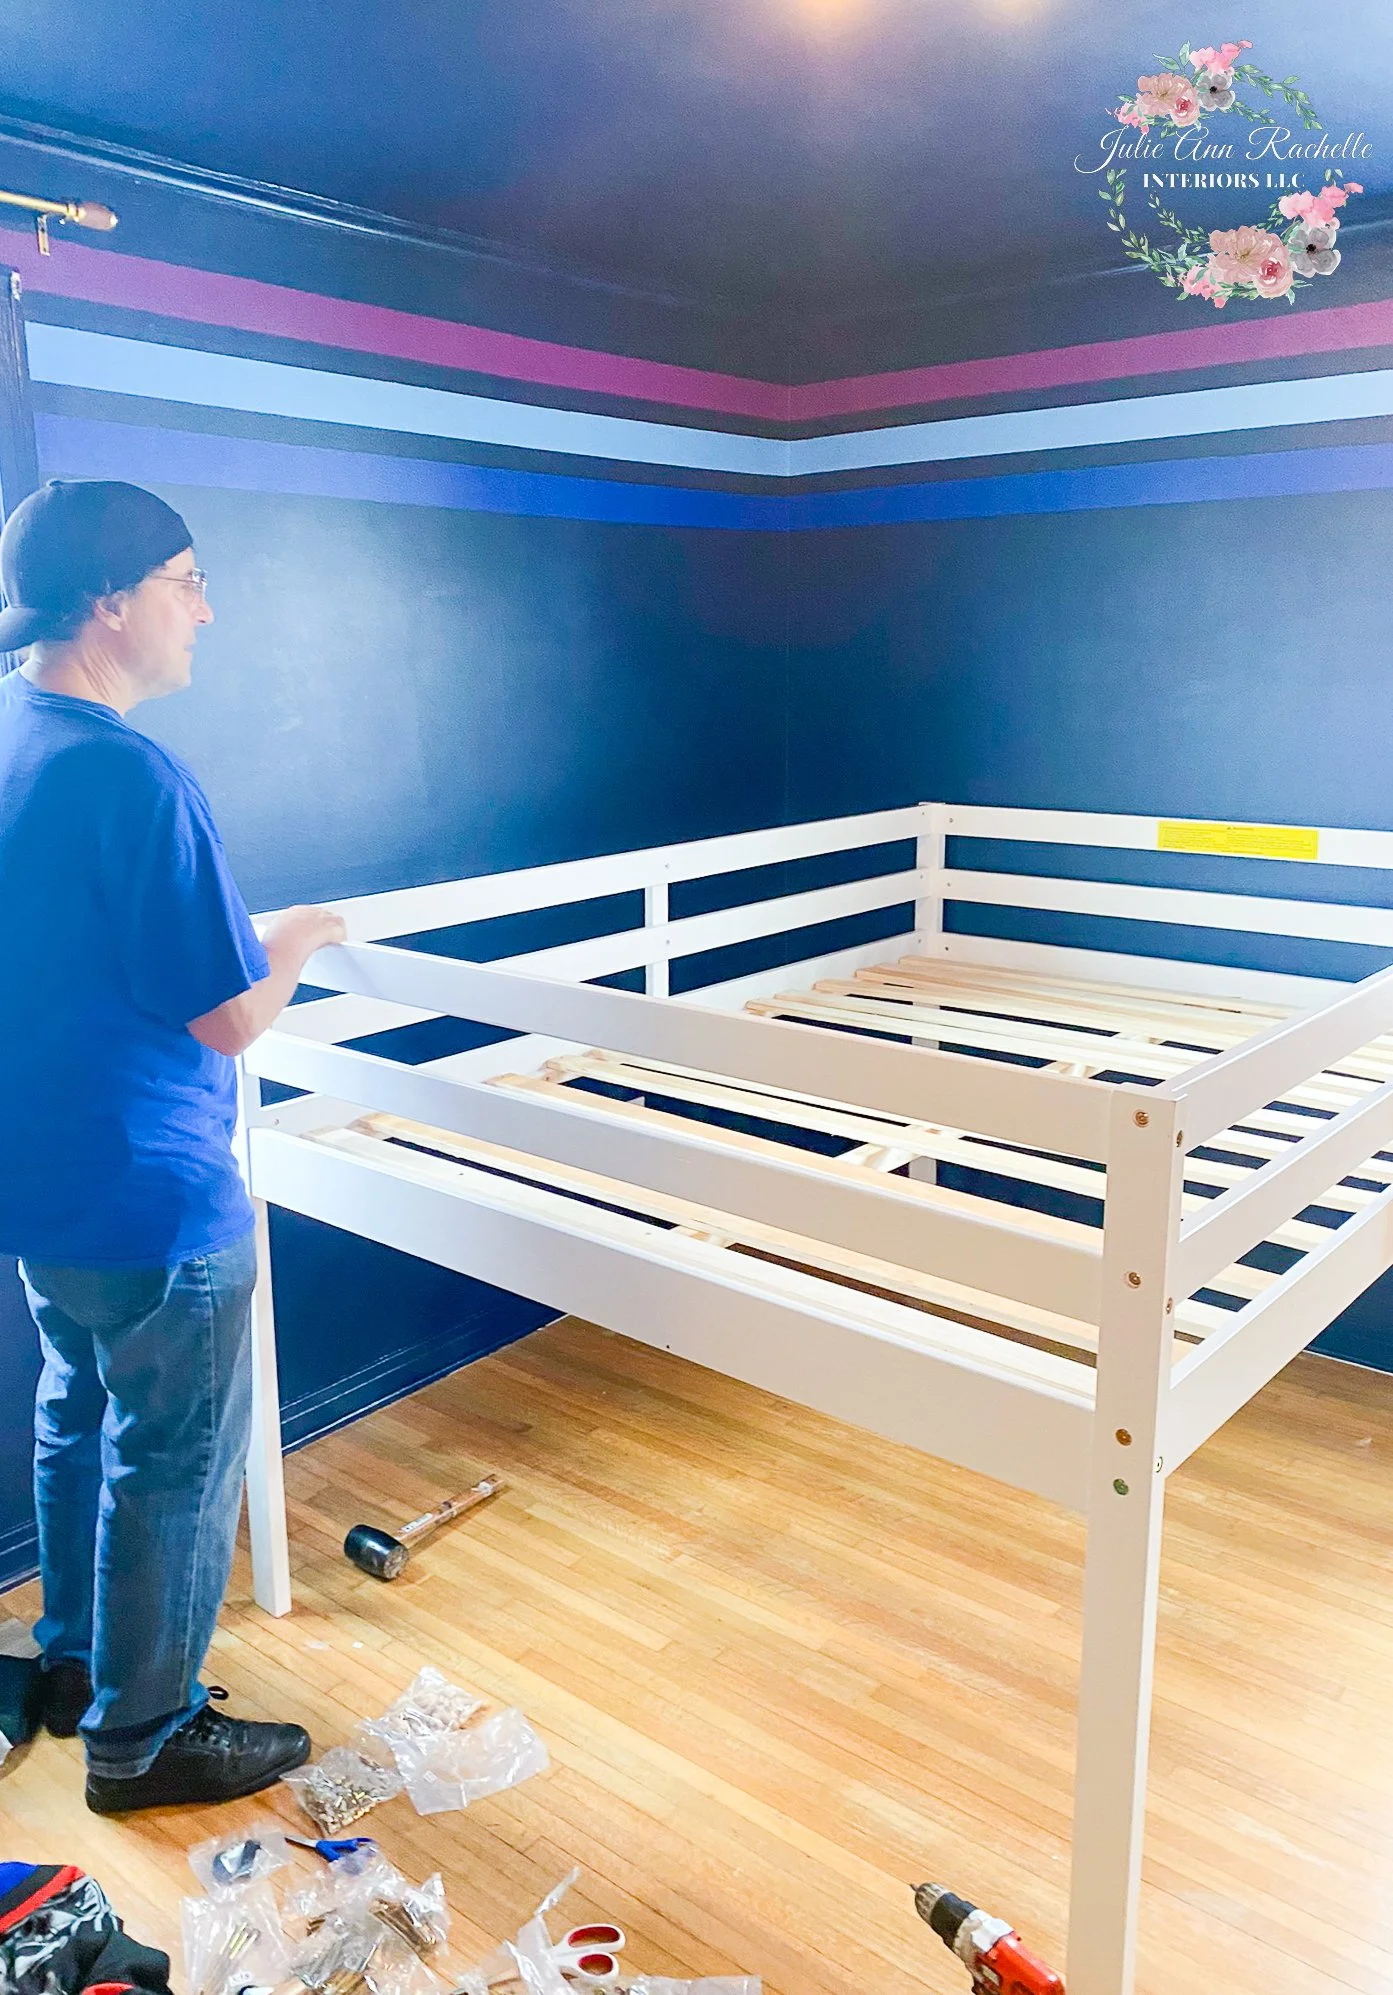
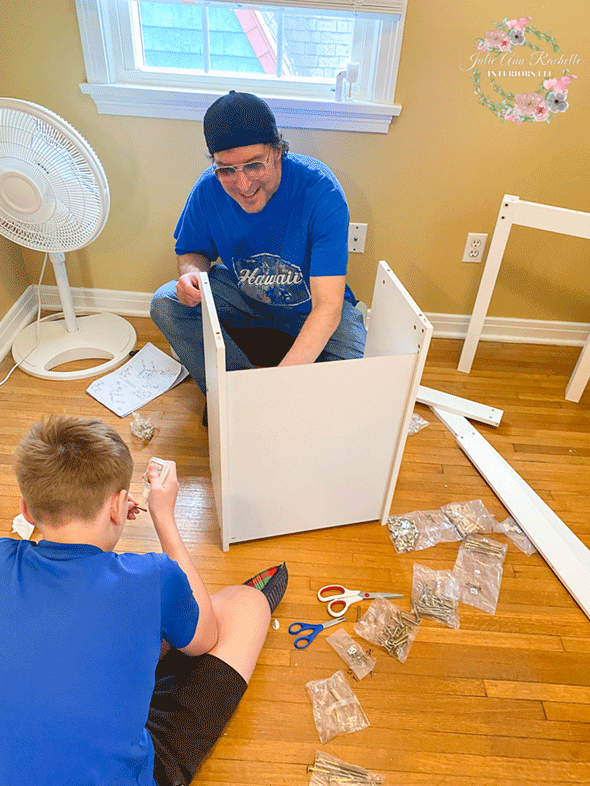
This week was truly a family endeavor. The task of assembling Logan's new loft bed was on our agenda.
Initially, my sister and I planned to handle it ourselves.
However, after my husband Dave looked over the assembly instructions, he insisted on helping out. Despite being busy with his music career, Dave found time to join us, turning the assembly into a memorable day.
On Saturday, we packed our tools and set out for my sister's house, a mere hour and a half drive away.
The night before the build, excitement kept me awake.
Arriving at my sister’s home by mid-morning after an hour's drive, we dove right into the task.
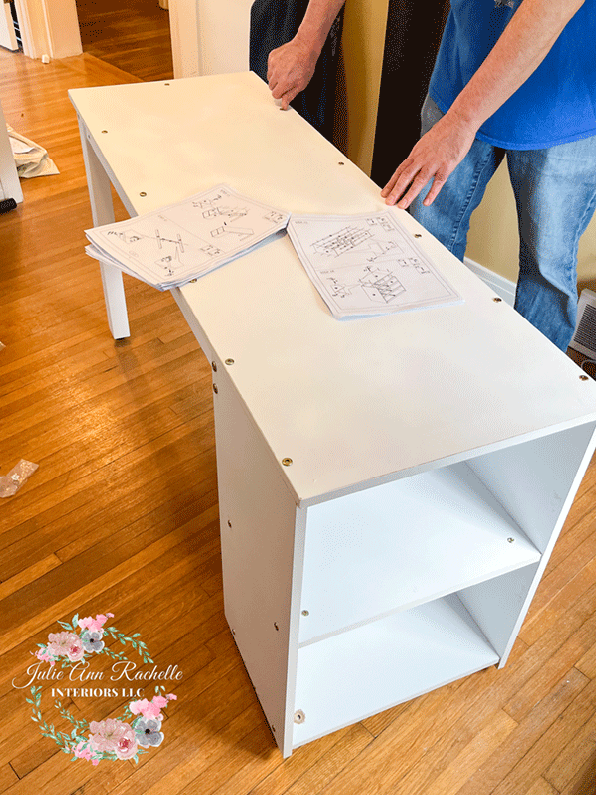
The setup was daunting—unpacking and organizing countless pieces.

Unboxing adventure! 📦✨ Week 4 of our One Room Challenge brings us to the heart of the action in creating a sensory-friendly teen bedroom. Here's my sister striking a fun pose amidst the chaos of constructing the perfect low loft bed for a room that's as special as its occupant. #OneRoomChallenge #TeenBedroomMakeover #SensoryFriendlySpaces
Remembering an online review that mentioned a four-and-a-half-hour build time with kids involved, we braced for a long day.
It ended up stretching until 8 PM!
Despite this, the shared effort brought us closer, turning a simple assembly into memorable family bonding.
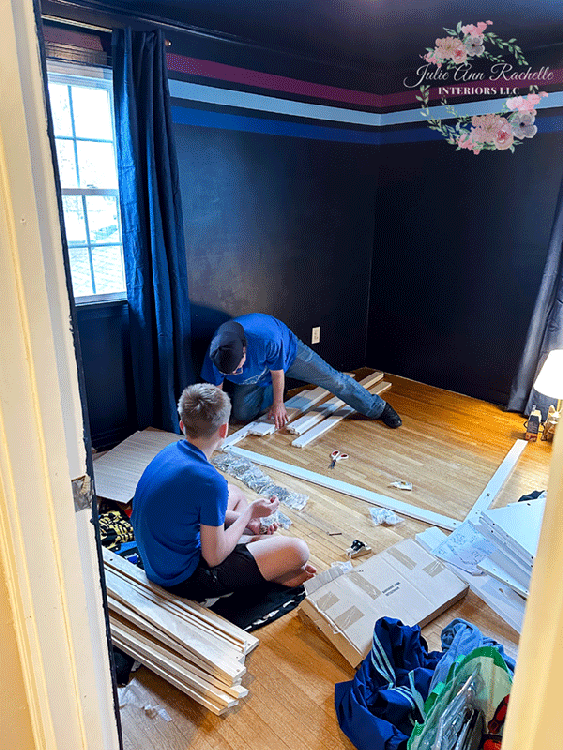
We started by unboxing and laying out all the parts, trying our best to organize them alphabetically. However, not all parts were labeled, which added a bit of a challenge.
Dave took the lead on the loft bed with Logan at his side, while my sister Dana and I focused on another important task—the headboard.
From a challenging pile of unassembled parts to a sturdy loft bed, this weekend was all about family teamwork. With laughter and teamwork, even the trickiest of assembly jobs turned into an unforgettable day of bonding. Here's to family, persistence, and a new favorite spot for Logan! #FamilyProject #LoftBedAssembly

Progress unfolds in rich navy hues! 🎨🛏️ Week 4 of our One Room Challenge showcases a striking teen bedroom makeover, with accent stripes setting the stage. Here's Logan teaming up with Uncle Dave to assemble the loft bed, proving that even the smallest hands make a big difference. A sensory-friendly space is just around the corner! #OneRoomChallenge #TeenRoomMakeover #FamilyDIY

Week 4 Progress! The rich navy walls with those cool accent stripes are setting the scene for Logan's futuristic room. The loft bed frame is taking shape, providing a sleep and study zone underneath. This is all part of creating a sensory-friendly space he'll love. Thanks to my husband David for the awesome DIY skills! #OneRoomChallenge #sensoryfriendly #teenbedroommakeover #DIYloftbed #JulieAnnRachelleInteriors
Week 4 of the #OneRoomChallenge is all about progress! Check out the completed low loft bed platform for Logan's sensory-friendly teen bedroom makeover. Huge shoutout to my DIY-master husband for putting it together! This space-saving design creates a dedicated sleep zone while maximizing floor space for activities. Stay tuned for the next steps in building his dream room! #sensoryfriendlybedroom #teenbedroomideas #DIYloftbed #lowloftbed #interiordesign
Building a Dream Room: Week 4 of the #OneRoomChallenge! My husband, David (the DIY wiz!) and our nephew Logan are teaming up to create a loft bed and desk for Logan's futuristic teen bedroom makeover. This space-saving design in a crisp white offers contrast in the navy color drenched room. The loft bed will maximize functionality while creating a dedicated sleep and study zone. Stay tuned for more progress on this sensory-friendly teen room! #sensoryfriendlybedroom #teenbedroomideas #DIYloftbed #fathersonproject #interiordesign
The Upholstering Adventure
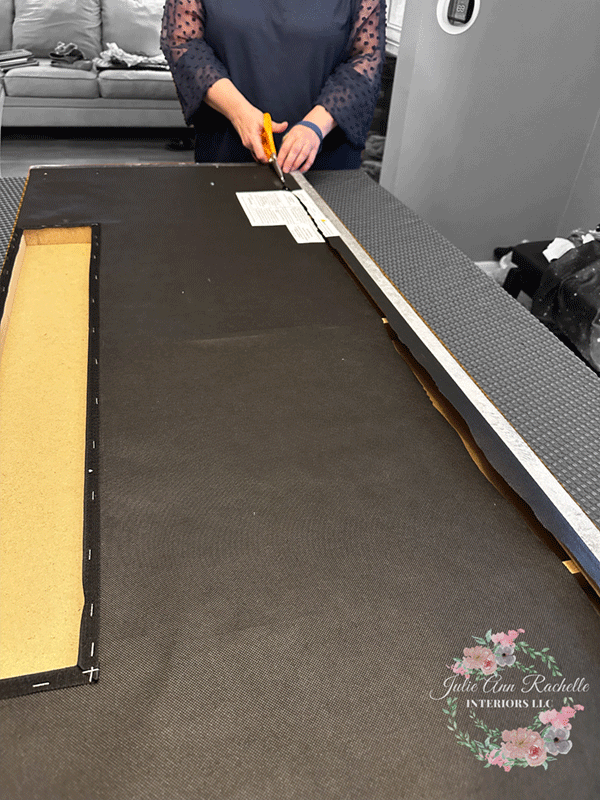
Dave and Logan tackled the bed while my sister, Dana, and I started on a DIY headboard.
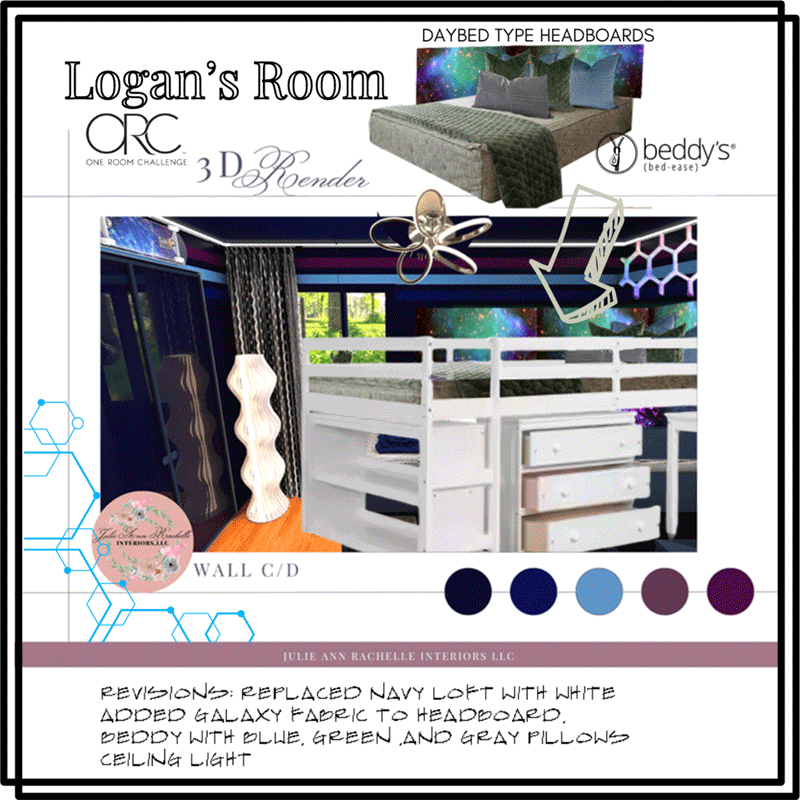
Dave and Dana initially doubted it needed a redo. But after laying eyes on the existing gray shimmery fabric, which shifted shades upon touch, we decided it deserved a refresh. Logan's vote was decisive (ew!) —custom printed fabric designed by me was the way to go.
![DIY Headboard Makeover: Week 4 #OneRoomChallenge! Gray fabric headboard on dining room table, prepped for reupholstery with a custom galaxy print design by [your name]. Sisters tackle the project together, having fun with the staple gun for a teen's](https://images.squarespace-cdn.com/content/v1/5d4d0610082420000108d911/bc2071c5-773d-490c-9499-cfc3993aff20/OneRoomChallenge_Week4_DIYHeadboard_GalaxyTeenRoom.png)
Sisterhood of the DIY: Reupholstering Mission Begins! ♀️♀️ Week 4 of the #OneRoomChallenge finds me and my sister Dana tackling Logan's headboard for his futuristic teen bedroom makeover. We initially thought the existing gray fabric was fine (thanks for the vote of confidence, Dave! ) but that weird color shift upon touch sealed its fate. The real MVP? Logan, whose vote for a custom galaxy print fabric is a total win! Stay tuned to see this headboard transformation unfold! #sensoryfriendlybedroom #teenbedroomideas #DIYheadboard #galaxybedroom #interiordesign
Using skills from an upholstery class I took decades ago, I opted for a minky fabric—soft and ideal for Logan’s sensory needs. It is a gamble, but its softness made it perfect for Logan's sensory needs. The fabric claimed it was suitable for home decor, and we were eager to see how it would hold up. The headboard took us about three hours to complete, a testament to the power of good tutorials and a staple gun.
I had learned the basics of upholstery two decades ago, but this was a real test of those long-dormant skills!
I think the headboards look fabulous. What do you think?
Crafting simplicity! ✂️🖼️ Turning a basic headboard into a chic, wall-mounted accent piece. Cutting away the back fabric makes it ready to hang seamlessly, enhancing our space with a touch of elegance. #DIYDecor #WallMountedHeadboard #HomeStylingTips
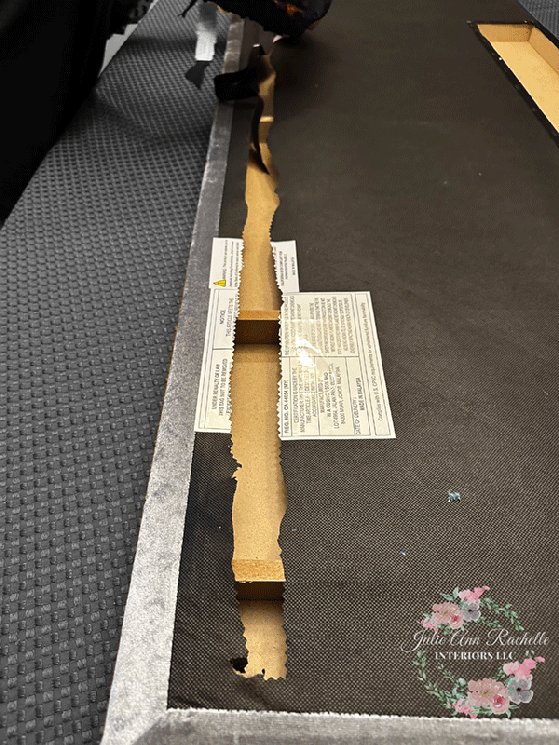
DIY magic at work! ✂️🖼️ Transforming a simple headboard into a wall-hung masterpiece. By cutting the black fabric on the back, we've set the stage to hang these headboards just like picture frames. A seamless addition that elevates the entire room's decor! #DIYHeadboard #HomeDecorHacks #CreativeInteriors
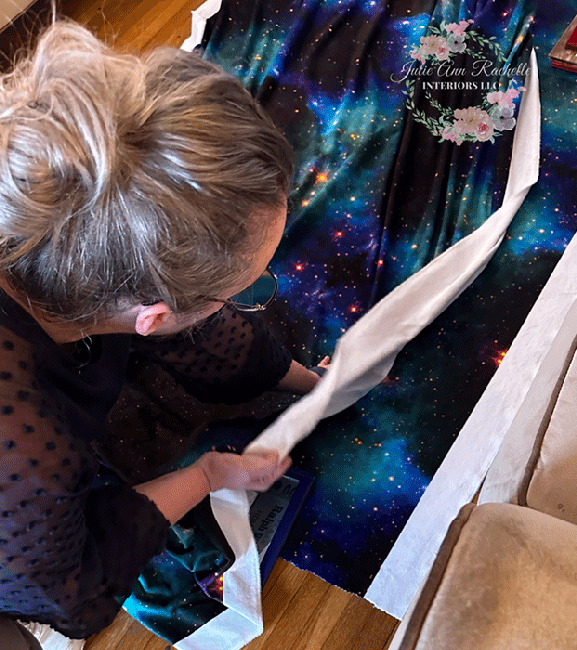
Stellar style in the making! ✨🛏️ Here's the custom-printed fabric I designed using an awe-inspiring Hubble Telescope image from WikiCommons. Now, I'm meticulously trimming it to fit our headboard, ensuring every star and swirl enhances our unique bedroom cosmos. #SpaceInspiredDecor #CustomDIY #BedroomMakeover


Precision in progress! 🔨🛏️ Here I am securing the placement of our newly chosen fabric on the headboard with tacks before it's all set with staples. This step ensures the pattern sits just right for a flawless finish. Follow along as this reupholstery project transforms from basic to breathtaking! #ReupholsteryDIY #HeadboardMakeover #HomeImprovement

Mastering the corners! 📐✂️ Diving into the details of headboard re-upholstery, I'm cutting a Y-shape into the fabric to ensure a snug, professional fit around the corners. Thanks to a helpful YouTube tutorial, every snip is spot on! Join me in transforming this piece into a stylish statement. #DIYTutorial #FabricCutting #HeadboardProject


The Layout Labyrinth
As dinner approached, a new challenge emerged. I had assumed the loft bed’s ladder could attach on either side, but was wrong. This error disrupted our planned layout as the desk was supposed to extend out from under the pillow area, near the window.
This oversight required a quick rethink of the room's layout. After everyone brainstorming, Logan's practical suggestion saved the day—repositioning the desk to roll out towards his closet, an adjustment that required a bit of handy work from my husband. His quick thinking not only saved the day but also infused his personality into the design. Dave made the adjustment to the wheels, and it worked beautifully!

Rolling with the changes! 🔄🛏️ When we realized the loft bed’s ladder couldn't attach as we planned, it was time for a layout reshuffle. Thanks to Logan's smart suggestion, we repositioned the desk to roll out towards his closet instead. With a little quick-fix magic on the wheels by Dave, the new setup not only works perfectly but adds a personal touch to the space! #RoomRedesign #CreativeSolutions #HomeDIY
Desk assembly complete—finally! 🎉🛠️ After wrestling with what could only loosely be called 'instructions', and a minor setback for installing a part backward (yes, I got booted out for that!), the desk is now perfectly built. Here's to perseverance and a little humor making the tough tasks a lot more fun! #DeskSetup #DIYChallenges #AssemblySuccess

Taking a well-deserved break! 🛋️💡 After a bit of rethinking and rearranging, here's my sister showcasing the new spot for the desk, smartly pulled out from under the loft towards the closet instead of from under the pillows. A change that makes all the difference in functionality and flow! #HomeMakeover #DeskRearrangement #DesignSuccess
A last-minute dresser change meant a quick trip to Lowe's for new hardware. Although I had pre-ordered knobs, they no longer suited the new dresser Dana and Logan chose. We found perfect replacements that complemented the modern style of the new furniture.
While I had initially planned out the lighting, after reflecting on it overnight, I decided to revise my approach. I'll need to draw up a new plan, but I'll share more on that in our next update.
Secret Storage and Surprises
As evening approached, we discovered the bookcase we planned to use wouldn't fit as intended. It couldn't fit where we originally planned, but Logan’s excitement about having a cozy nook under his loft bed sparked a new idea. We decided to turn the bookcase towards the bed, creating hidden storage for his treasures.
Our visit to Lowe's for some last-minute hardware changes reminded me that flexibility is key in design and life. The new dresser Logan and Dana chose called for a modern touch, so we updated our plans to include sleek, contemporary knobs that pulled the look together.
As we wrapped up the day, Logan was so eager to enjoy his new space that he couldn’t wait to move in, even though the mattress setup wasn’t quite complete. He begged to have a friend over to spend the night. He ended up having to wait a night because the mattress needed extra support. My husband had to send specifications for an MDF board to support the mattress properly without a box spring.
Concept with Beddy’s bedding

“After” thus far

Final Thoughts
As we wrap up this week's updates for the One Room Challenge, we're reminded of the power of perseverance, creativity, and a little bit of flexibility.
Transforming Logan's bedroom into a sensory-friendly haven has been a journey of both challenges and victories.
From navigating the complexities of loft bed assembly to rethinking room layouts and tackling upholstery adventures, each step has brought us closer to creating a space that truly reflects Logan's needs and personality.
The teamwork displayed by everyone, especially with contributions from Dave's handy skills and Logan's insightful suggestions, has not only made the project a success but also infused it with a sense of family and love.
It's in these moments, when we come together to solve a problem or adjust a plan, that the true spirit of DIY and design shines through.
This week, we saw a room start to come alive with the vibrant navy walls and the functional yet stylish low loft bed.
The headboards, now adorned with custom fabric, add a personalized touch that speaks directly to Logan's tastes and interests.
And let’s not forget the cleverly repositioned desk that promises to enhance Logan's use of his space efficiently.
Looking ahead, we are excited to continue this transformation journey.
With each brush stroke, each screw turned, and every fabric tucked, we are not just building a room; we are crafting a retreat where Logan can feel comfortable and inspired.
In the meantime, let us know in the comments which you like better: the loft bed or the headboards?
Next Week's Tease
Join us next Wednesday as we dive deeper into the decorative details and functional adjustments that promise to make Logan's bedroom a sanctuary tailored just for him. Expect to see some special touches being added, possibly with a helping hand from a very special guest—Logan’s Nana!
We value your thoughts and engagement. Do you have any tips or ideas you’d like to see incorporated into Logan's room? Perhaps some insights on sensory-friendly designs or favorite DIY tricks? Share them with us in the comments below or on our social media platforms. Your input is a crucial part of this creative process!
Remember, the journey doesn’t just end with a beautiful room; it’s about creating a space that Logan can call his own, where every element is a testament to the love and thought put into it. Stay tuned for more updates, and thank you for being a part of this transformative home makeover.
See you next week for another exciting installment of Logan's futuristic sensory escape!
Stay up-to-date on Logan's room makeover by following my blog posts at the Blended Decor Blog by subscribing and follow social media updates on Instagram.
Week One: April 3 Introduction and Inspiration
Week Two: April 10 Design Concept
Week Three: April 17 Painting Tips
Week Four: April 24 DIY Headboard and Low Loft Build
Week Five: May 1 Unboxing, Lighting, ORC FAQs
Week Six: May 8 Must Have Tool for Interior Designers
Week Seven: May 15 Using Technology and Apps For the Win
Week Eight: May 22 The Big Reveal! Let’s party!!!
Stay tuned for next week's update, where we'll tackle final touches and perhaps complete the painting. Your thoughts and suggestions are always welcome, so drop us a comment or join the conversation on social media!
Join Us on This Journey
Your thoughts and interactions on this journey mean the world to us. Feel free to leave comments, share your ideas on Instagram (@julie_ann_rachelle), or pin your favorite designs on Pinterest. Your engagement inspires us to keep creating spaces that are not only beautiful but also deeply personal.
Stay tuned for next week’s update, where we'll share more about Logan's first impressions of his new room and continue documenting our progress. Follow us on the Blended Decor Blog to keep up with every step of this wonderful challenge.
Catch our post next Wednesday for more updates on Logan's room. We'll be diving into the final touches and preparing for the big reveal. Can't wait to share it with you! Join us as we bring Logan’s vision to life, creating a space where he can thrive and feel truly at home.
P.S. Did you miss this funny photo of Logan last week on Instagram? Pre-teen angst!
Would you like me to put together a customized design for you?
Let’s schedule a free no obligation discovery call! Learn more
Fresh Content on the Blended Decor Blog


Categories

Affiliate Disclosure
Copyright Act of 1976 Section 107 Fair Use Disclaimer
Related Reading


March is the decorating no-man's-land: not quite winter, not quite spring. These ten quick wins help your home get ahead of the season without a project, a big budget, or an entire Saturday.